WebSurfer's Home

トップ > Blog 1   |   ログイン
APMLフィルター

ASP.NET Identity のロール管理 (MVC)

by WebSurfer 2017年11月2日 16:40

ASP.NET Identity ベースのフォーム認証を実装した ASP.NET MVC5 アプリケーションで、管理者がロール管理を行う機能を実装する例を書きます。先の記事「ASP.NET Identity のユーザー管理 (MVC)」の続きです。
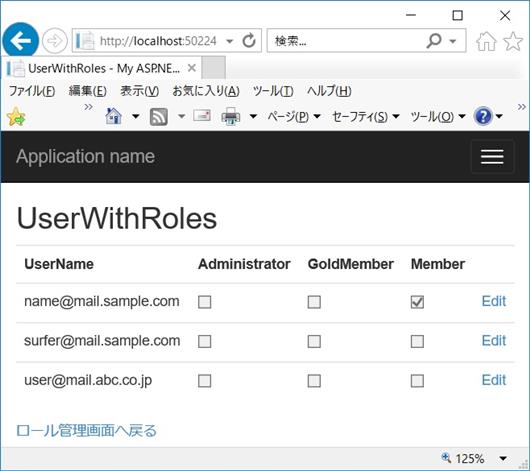
ロール管理画面

CodeZine の記事「ASP.NET Identityでユーザーに役割(ロール)を持たせる 」に、ASP.NET Web Forms アプリ用のユーザー管理画面を作る手順が載っていますが、その MVC 版です。

ベースとなるのは、先の記事「ASP.NET Identity のユーザー管理 (MVC)」と同様、Visual Studio 2015 Community で MVC のテンプレートを利用し、認証に「個別のユーザーアカウント」を指定して自動生成させたプロジェクトです。

それにロール情報の追加、変更、削除および登録済みユーザーのロールのアサインを行う機能を実装するには以下のようにします:

(1) コードの追加

ロール情報の追加、変更、削除を行うのに用いるクラスは、IdentityRole クラスRoleManager<TRole, TKey> クラスです。

テンプレートで自動生成されたコードにはそれらのコードは含まれていませんので追記する必要があります。

具体的には、Models\IdentityModels.cs, App_Start\IdentityConfig.cs, App_Start\Startup.Auth.cs の 3 つの既存のファイルに、CodeZine の記事「ASP.NET Identityでユーザーに役割(ロール)を持たせる」を参考にコードを追加します。(記事のコードをそのままコピペすれば OK)

何を追加するかを簡単に書きますと、IdentityModels.cs, IdentityConfig.cs, Startup.Auth.cs の順に、以下の通りです。

  1. IdentityRole クラスを継承した ApplicationRole クラスを IdentityModels.cs に追加。
  2. RoleManager<TRole, TKey> クラスを継承した ApplicationRoleManager クラスを IdentityConfig.cs に追加。定義には ApplicationRoleManager クラスのインスタンスを生成して OwinContext に登録するための Create メソッドを含める。Create メソッドにはロールストアに何も定義されてない場合 Administrator という名前のロールを作成するコードも含まれています。
  3. ApplicationRoleManager のインスタンスを生成して OwinContext に登録するコードを Startup.Auth.cs の ConfigureAuth メソッドに追加。これにより、Controller で HttpContext.GetOwinContext() メソッドにより OwinContext を取得し、それから Get<ApplicationRoleManager>() メソッドで ApplicationRolerManager オブジェクトを取得できるようになります。

(2) Migrations を実施

上記 (1) の作業後アプリを実行すると、先にユーザー情報を登録して EF Code First の機能で DB を生成済みの場合は以下のようなエラーが出ると思います。ちなみに、下の画像でエラーとなっている行は、上記 (1) - 2 で追加した Create メソッドでロールストアにあるロール情報を取得するものです。
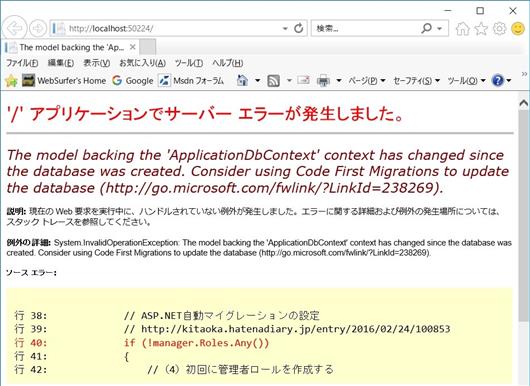
エラー画面

その場合は Migrations 実施してから再度実行してください。

具体的には、Visual Studio のパッケージマネージャーコンソールで、Enable-Migrations コマンドを実行して Code First Migrations を有効にし、次に Update-Database –Verbose コマンドを実行して保留中の移行をデータベースに適用します。

(3) AspNetRoles テーブルの確認

上記 (2) でエラーなく無事実行できれば、以下の画像のようにロール情報のストアとなる AspNetRoles テーブルに Discriminator フィールドが追加され、「結果」ウィンドウに示すように Name が Administrator というレコードができているはずです。
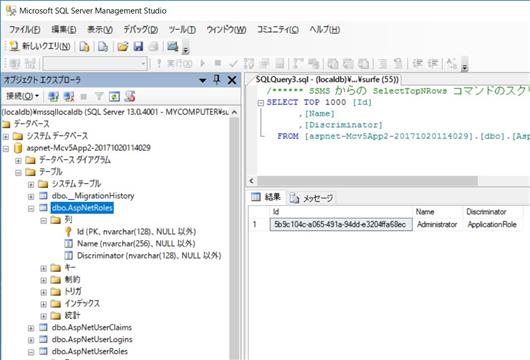
AspNetRoles テーブル

(4) ロール管理用 Controller / View の実装

ロール情報の追加、変更、削除および登録済みユーザーのロールのアサインを行うための Controller / View を実装します。Controller の実装例を以下に示します。説明はコード内のコメントに書きましたので、それを見てください。

using System;
using System.Collections.Generic;
using System.Linq;
using System.Web;
using System.Web.Mvc;

// 上は自動生成されたもの。それに以下の名前空間を追加
using Microsoft.AspNet.Identity;
using Microsoft.AspNet.Identity.Owin;
using System.Net;
using System.ComponentModel.DataAnnotations;
using System.Threading.Tasks;
using Mcv5App2.Models;

namespace Mcv5App2.Controllers
{
  // 以下の RoleModel, UserWithRoleInfo, RoleInfo の 3 クラス
  // はここで利用する Model。Controller 内に定義したのは単に
  // 分けるのが面倒だから

  // アクションメソッド Create, Edit 用の Model
  public class RoleModel
  {
    [Required]
    [StringLength(
      100, 
      ErrorMessage = "{0} は {2} 文字以上",
      MinimumLength = 3)]
    [Display(Name = "Role")]
    public string Role { get; set; }
  }

  // アクションメソッド UserWithRoles, EditRoleAssignment
  //  (各ユーザーのロール一覧表示、ロールのアサイン・削除) 
  // 用の Model
  public class UserWithRoleInfo
  {
    public UserWithRoleInfo()
    {
      UserRoles = new List<RoleInfo>();
    }

    public string UserId { set; get; }
    public string UserName { set; get; }
    public string UserEmail { set; get; }

    public IList<RoleInfo> UserRoles { set; get; }
  }

  public class RoleInfo
  {
    public string RoleName { set; get; }
    public bool IsInThisRole { set; get; }
  }


  // ここから Controller のコード
  public class RolesController : Controller
  {
    private ApplicationUserManager _userManager;
    private ApplicationRoleManager _roleManager;

    public ApplicationUserManager UserManager
    {
      get
      {
        return _userManager ?? 
            HttpContext.GetOwinContext().
            GetUserManager<ApplicationUserManager>();
      }
      private set
      {
        _userManager = value;
      }
    }

    public ApplicationRoleManager RoleManager
    {
      get
      {
        return _roleManager ?? 
            HttpContext.GetOwinContext().
            Get<ApplicationRoleManager>();
      }
      private set
      {
        _roleManager = value;
      }
    }

    // GET: Roles(登録済みロールの一覧)
    // Model は ApplicationRole
    public ActionResult Index()
    {
      var roles = 
        RoleManager.Roles.OrderBy(role => role.Name);
      return View(roles);
    }

    // GET: Roles/Details/Id(指定 Id のロール詳細)
    // 上の一覧以上の情報は含まれないので不要かも・・・
    // Model は ApplicationRole
    public async Task<ActionResult> Details(string id)
    {
      if (id == null)
      {
        return new HttpStatusCodeResult(
                        HttpStatusCode.BadRequest);
      }

      var target = await RoleManager.FindByIdAsync(id);
      if (target == null)
      {
        return HttpNotFound();
      }
      return View(target);
    }

    // GET: Roles/Create(新規ロール作成・登録)
    // Model は上に定義した RoleModel クラス
    public ActionResult Create()
    {
      return View();
    }

    // POST: Roles/Create(新規ロール作成・登録)
    // Model は上に定義した RoleModel クラス
    [HttpPost]
    [ValidateAntiForgeryToken]
    public async Task<ActionResult> Create(RoleModel model)
    {
      if (ModelState.IsValid)
      {
        // ユーザーが入力したロール名を model.Role から取得し
        // て ApplicationRole を生成
        var role = new ApplicationRole { Name = model.Role };

        // 上の ApplicationRole から新規ロールを作成・登録
        var result = await RoleManager.CreateAsync(role);

        if (result.Succeeded)
        {
          // 登録に成功したら Roles/Index にリダイレクト
          return RedirectToAction("Index", "Roles");
        }

        // result.Succeeded が false の場合 ModelSate にエ
        // ラー情報を追加しないとエラーメッセージが出ない。
        // AccountController と同様に AddErrors メソッドを
        // 定義して利用(一番下に定義あり)
        AddErrors(result);
      }

      // ロールの登録に失敗した場合、登録画面を再描画
      return View(model);
    }

    // GET: Roles/Edit/Ed(指定 Id のロール情報の更新)
    // ここで更新できるのはロール名のみ
    // Model は上に定義した RoleModel クラス
    public async Task<ActionResult> Edit(string id)
    {
      if (id == null)
      {
        return new HttpStatusCodeResult(
                            HttpStatusCode.BadRequest);
      }

      var target = await RoleManager.FindByIdAsync(id);

      if (target == null)
      {
        return HttpNotFound();
      }

      RoleModel model = new RoleModel() { Role = target.Name };

      return View(model);
    }

    // POST: Roles/Edit/Id(指定 Id のロール情報の更新)
    // ここで更新できるのはロール名のみ
    // Model は上に定義した RoleModel クラス
    [HttpPost]
    [ValidateAntiForgeryToken]
    public async Task<ActionResult> 
                        Edit(string id, RoleModel model)
    {
      if (id == null)
      {
        return new HttpStatusCodeResult(
                            HttpStatusCode.BadRequest);
      }

      if (ModelState.IsValid)
      {
        var target = await RoleManager.FindByIdAsync(id);

        // ユーザーが入力したロール名を model.Role から取得し
        // て ApplicationRole の Name を書き換え
        target.Name = model.Role;

        // Name を書き換えた ApplicationRole で更新をかける
        var result = await RoleManager.UpdateAsync(target);

        if (result.Succeeded)
        {
          // 更新に成功したら Roles/Index にリダイレクト
          return RedirectToAction("Index", "Roles");
        }

        // result.Succeeded が false の場合 ModelSate にエ
        // ラー情報を追加しないとエラーメッセージが出ない。
        AddErrors(result);
      }

      // 更新に失敗した場合、編集画面を再描画
      return View(model);
    }

    // GET: Roles/Delete/Id(指定 Id のロールを削除)
    // 階層更新が行われているようで、ユーザーがアサインされて
    // いるロールも削除可能。
    // Model は ApplicationRole
    public async Task<ActionResult> Delete(string id)
    {
      if (id == null)
      {
        return new HttpStatusCodeResult(
                            HttpStatusCode.BadRequest);
      }

      var target = await RoleManager.FindByIdAsync(id);

      if (target == null)
      {
        return HttpNotFound();
      }

      return View(target);
    }

    // POST: Roles/Delete/Id(指定 Id のロールを削除)
    // Model は ApplicationRole
    // 上の Delete(string id) と同シグネチャのメソッド
    // は定義できないので、メソッド名を変えて、下のよう
    // に ActionName("Delete") を設定する
    [HttpPost, ActionName("Delete")]
    [ValidateAntiForgeryToken]
    public async Task<ActionResult> 
                        DeleteConfirmed(string id)
    {
      if (id == null)
      {
        return new HttpStatusCodeResult(
                            HttpStatusCode.BadRequest);
      }

      var target = await RoleManager.FindByIdAsync(id);

      if (target == null)
      {
        return HttpNotFound();
      }

      // ユーザーがアサインされているロールも以下の一行で
      // 削除可能。内部で階層更新が行われているらしい。
      var result = await RoleManager.DeleteAsync(target);

      if (result.Succeeded)
      {
        // 削除に成功したら Roles/Index にリダイレクト
        return RedirectToAction("Index", "Roles");
      }

      // result.Succeeded が false の場合 ModelSate にエ
      // ラー情報を追加しないとエラーメッセージが出ない。
      AddErrors(result);

      // 削除に失敗した場合、削除画面を再描画
      return View(target);
    }


    // 以下は:
    // (1) UserWithRoles で、上の画像のように、登録済みユーザー
    //     の一覧と各ユーザーへのロールのアサイン状況を表示し、
    // (2) Edit ボタンクリックで EditRoleAssignment に遷移し、
    //     当該ユーザーへのロールのアサインを編集して保存する
    // ・・・ためのもの。

    // GET: Roles/UserWithRoles
    // ユーザー一覧と各ユーザーにアサインされているロールを表示
    // Model は上に定義した UserWithRoleInfo クラス
    public async Task<ActionResult> UserWithRoles()
    {
      var model = new List<UserWithRoleInfo>();

      // ToList() を付与してここで DB からデータを取得して
      // DataReader を閉じておかないと、下の IsInRole メソッド
      // でエラーになるので注意
      var users = UserManager.Users.
                  OrderBy(user => user.UserName).ToList();
      var roles = RoleManager.Roles.
                  OrderBy(role => role.Name).ToList();
            
      foreach (ApplicationUser user in users)
      {
        UserWithRoleInfo info = new UserWithRoleInfo();
        info.UserId = user.Id;
        info.UserName = user.UserName;
        info.UserEmail = user.Email;

        foreach (ApplicationRole role in roles)
        {
          RoleInfo roleInfo = new RoleInfo();
          roleInfo.RoleName = role.Name;
          roleInfo.IsInThisRole = await
              UserManager.IsInRoleAsync(user.Id, role.Name);
          info.UserRoles.Add(roleInfo);
        }
        model.Add(info);
      }

      return View(model);
    }

    // GET: Roles/EditRoleAssignment/Id
    // 指定 Id のユーザーのロールへのアサインの編集
    // Model は上に定義した UserWithRoleInfo クラス
    public async Task<ActionResult> 
                        EditRoleAssignment(string id)
    {
      if (id == null)
      {
        return new HttpStatusCodeResult(
                            HttpStatusCode.BadRequest);
      }

      var user = await UserManager.FindByIdAsync(id);

      if (user == null)
      {
        return HttpNotFound();
      }

      UserWithRoleInfo model = new UserWithRoleInfo();
      model.UserId = user.Id;
      model.UserName = user.UserName;
      model.UserEmail = user.Email;

      // ToList() を付与しておかないと下の IsInRole メソッド
      // で DataReader が閉じてないというエラーになる
      var roles = RoleManager.Roles.
                  OrderBy(role => role.Name).ToList();

      foreach (ApplicationRole role in roles)
      {
        RoleInfo roleInfo = new RoleInfo();
        roleInfo.RoleName = role.Name;
        roleInfo.IsInThisRole = await
            UserManager.IsInRoleAsync(user.Id, role.Name);
        model.UserRoles.Add(roleInfo);
      }

      return View(model);
    }

    // GET: Roles/EditRoleAssignment/Id
    // 指定 Id のユーザーのロールへのアサインの編集
    // Model は上に定義した UserWithRoleInfo クラス
    [HttpPost]
    [ValidateAntiForgeryToken]
    public async Task<ActionResult> 
      EditRoleAssignment(string id, UserWithRoleInfo model)
    {
      if (id == null)
      {
        return new HttpStatusCodeResult(
                            HttpStatusCode.BadRequest);
      }

      if (ModelState.IsValid)
      {
        IdentityResult result;

        foreach (RoleInfo roleInfo in model.UserRoles)
        {
          // id のユーザーが roleInfo.RoleName のロールに属して
          // いるか否か。以下でその情報が必要。
          bool isInRole = await 
            UserManager.IsInRoleAsync(id, roleInfo.RoleName);

          // roleInfo.IsInThisRole には編集画面でロールのチェッ
          // クボックスのチェック結果が格納されている
          if (roleInfo.IsInThisRole)
          {
            // チェックが入っていた場合

            // 既にロールにアサイン済みのユーザーを AddToRole
            // するとエラーになるので以下の判定が必要
            if (isInRole == false)
            {
              result = await UserManager.
                       AddToRoleAsync(id, roleInfo.RoleName);
              if (!result.Succeeded)
              {
                AddErrors(result);
                return View(model);
              }
            }
          }
          else
          {
            // チェックが入っていなかった場合

            // ロールにアサインされてないユーザーを
            // RemoveFromRole するとエラーになるので以下の
            // 判定が必要
            if (isInRole == true)
            {
              result = await UserManager.
                       RemoveFromRoleAsync(id, roleInfo.RoleName);
              if (!result.Succeeded)
              {
                AddErrors(result);
                return View(model);
              }
            }
          }                    
        }

        // 編集に成功したら Roles/UserWithRoles にリダイレクト
        return RedirectToAction("UserWithRoles", "Roles");
      }

      // 編集に失敗した場合、編集画面を再描画
      return View(model);
    }

    protected override void Dispose(bool disposing)
    {
      if (disposing)
      {
        if (_userManager != null)
        {
          _userManager.Dispose();
          _userManager = null;
        }

        if (_roleManager != null)
        {
          _roleManager.Dispose();
          _roleManager = null;
        }
      }

      base.Dispose(disposing);
    }

    // ModelSate にエラー情報を追加するためのヘルパメソッド
    private void AddErrors(IdentityResult result)
    {
      foreach (var error in result.Errors)
      {
        ModelState.AddModelError("", error);
      }
    }
  }
}

MSDN ライブラリの UserManager<TUser> クラスRoleManager<TRole, TKey> クラスの説明には非同期版メソッドしか書いてないのでそれらを使っていますが、同期版も拡張メソッドとして定義されているようです。ケースバイケースでどちらが適切かを考えて使い分けた方が良いかもしれません。

View はコントローラをベースにスキャフォールディング機能を利用して自動生成できます。Visual Studio でアクションメソッドのコードを右クリックして[ビューを追加(D)...]を選ぶと、そのためのダイアログが表示されます。

アクションメソッド EditRoleAssignment に対応する View は自動生成されるコードだけでは不十分でいろいろ追加・修正が必要です。以下にその完成版のコードを載せておきます。

@model Mcv5App2.Controllers.UserWithRoleInfo

@{
  ViewBag.Title = "EditRoleAssignment";
  Layout = "~/Views/Shared/_Layout.cshtml";
}

<h2>EditRoleAssignment</h2>


@using (Html.BeginForm())
{
  @Html.AntiForgeryToken()
    
  <h4>UserWithRoleInfo</h4>
  <hr />
  @Html.ValidationSummary("",new { @class="text-danger" })
  <table class="table">
    <tr>
      <th>
        @Html.DisplayNameFor(model => model.UserName)
      </th>
    @foreach (var role in Model.UserRoles)
    {
      <th>
        @Html.DisplayFor(modelItem => role.RoleName)
      </th>
    }
    </tr>
            
    <tr>
      <td>
        @Html.DisplayFor(model => model.UserName)
        @Html.HiddenFor(model => model.UserName)
        @Html.HiddenFor(model => model.UserEmail)
        @Html.HiddenFor(model => model.UserId)
      </td>
    @for (int i = 0; i < Model.UserRoles.Count; i++)
    {
      <td>
        @Html.EditorFor(model =>
                     model.UserRoles[i].IsInThisRole)
        @Html.HiddenFor(model => 
                     model.UserRoles[i].RoleName)
      </td>
    }
                    
    </tr>
  </table>
  <div class="form-group">
    <div class="col-md-offset-2 col-md-10">
      <input type="submit" value="Save" 
             class="btn btn-default" />
    </div>
  </div>
}

<div>
  @Html.ActionLink("Back to List", "UserWithRoles")
</div>

@section Scripts {
  @Scripts.Render("~/bundles/jqueryval")
}

上の View のコードで注意すべき点は、コレクション(上の例では Model.UserRoles で取得できる RoleInfo クラスのコレクション) についてはレンダリングされる html 要素の name 属性が連番のインデックスを含むようにすることです。具体的には、name="prefix[index].Property" というパターンにします。

そうしないとモデルバインディングがうまくいきません。その理由など詳しくは先の記事「コレクションのデータアノテーション検証」を見てください。

Tags: ,

MVC

ASP.NET Identity のユーザー管理 (MVC)

by WebSurfer 2017年10月29日 18:10

ASP.NET Identity ベースのフォーム認証を実装した ASP.NET MVC5 アプリケーションで、管理者がユーザー情報の追加、変更、削除を行う機能を実装する例を書きます。

ユーザー管理画面

CodeZine の記事「ASP.NET Identity でユーザーを管理する」に、ASP.NET Web Forms アプリ用のユーザー管理画面を作る手順が載っていますが、その MVC 版です。

ベースとなるのは、Visual Studio 2015 Community で MVC のテンプレートを利用し、認証に「個別のユーザーアカウント」を指定して自動生成させたプロジェクトです。設定は以下の画像を見てください。

MVC のテンプレート

上の設定で自動生成されたプロジェクトは ASP.NET Identity ベースのフォーム認証を使用する ASP.NET MVC5 アプリケーションの基本的機能を持ちます。

プロジェクトの作成後、Visual Studio で[デバッグの開始(S)]または[デバッグなしで開始(H)]で実行すると、Web サーバーとして IIS Express が立ち上がって web アプリが実行され、テンプレートに含まれている Home/Index がブラウザ(デフォルトで IE)に表示されます。

そこから[Register]をクリックしてユーザー登録を行うと、初回に EF Code First と LocalDB の機能を利用してユーザー情報のストア(.mdf ファイル)が App_Data フォルダに生成され、その後は登録した Email とパスワードでログイン可能になります。

その状態から、Web アプリケーションに管理者がユーザー情報の追加、変更、削除を行う機能を実装します。

ユーザー情報の追加、変更、削除を行うのに用いるクラスは以下の通りです。いずれもテンプレートから自動生成されたコードに完全な形で含まれているので、それらをそのまま利用します。

(1) Models/IdentityModels.cs

(2) App_Start/IdentityConfig.cs

また、App_Start/Startup.Auth.cs の Startup クラスで、ApplicationUserManager のインスタンスを OwinContext へ登録するコードも自動生成されます。

なので、Controller では HttpContext.GetOwinContext() で OwinContext を取得し、それから GetUserManager<ApplicationUserManager>() メソッドで ApplicationUserManager オブジェクトを取得できるようになっています。

それらを利用してユーザー情報の追加、変更、削除を行う Controller の実装例を以下に示します。説明はコード内のコメントに書きましたので、それを見てください。

using System;
using System.Collections.Generic;
using System.Linq;
using System.Web;
using System.Web.Mvc;

// 上は自動生成されたもの。それに以下の名前空間を追加
using Microsoft.AspNet.Identity;
using Microsoft.AspNet.Identity.Owin;
using Mcv5App2.Models;
using System.Threading.Tasks;
using System.Net;
using System.ComponentModel.DataAnnotations;

namespace Mcv5App2.Controllers
{
  // Edit 用に AccountViewModels.cs の既存の RegisterViewModel
  // を流用しようとしたが、パスワードを入力しない場合は検証に
  // 引っかかっるので、以下の EditViewModel を定義して利用。
  // (Controller 内に定義したのは単に分けるのが面倒だから)
  public class EditViewModel
  {
    [Required]
    [EmailAddress]
    [Display(Name = "Email")]
    public string Email { get; set; }

    // PasswordValidator を使えばここでの検証は不要
    [DataType(DataType.Password)]
    [Display(Name = "Password")]
    public string Password { get; set; }

    [DataType(DataType.Password)]
    [Display(Name = "Confirm password")]
    [System.ComponentModel.DataAnnotations.Compare(
     "Password", 
     ErrorMessage = 
     "Password と Confirm Password が一致しません")]
    public string ConfirmPassword { get; set; }
  }


  // ここから Controller のコード
  public class UsersController : Controller
  {
    private ApplicationUserManager _userManager;

    public ApplicationUserManager UserManager
    {
      get
      {
        return _userManager ?? 
            HttpContext.GetOwinContext().
            GetUserManager<ApplicationUserManager>();
      }
      private set
      {
        _userManager = value;
      }
    }

    // GET: Users(登録済みユーザーの一覧)
    // Model は ApplicationUser
    public ActionResult Index()
    {
      var users = UserManager.Users.
                OrderBy(user => user.UserName);
      return View(users);
    }

    // GET: Users/Details/Id(指定 Id のユーザー詳細)
    // Model は ApplicationUser
    public async Task<ActionResult> Details(string id)
    {
      if (id == null)
      {
        return new HttpStatusCodeResult(
                        HttpStatusCode.BadRequest);
      }

      var target = await UserManager.FindByIdAsync(id);

      if (target == null)
      {
        return HttpNotFound();
      }

      return View(target);
    }

    // GET: Users/Create(新規ユーザー作成・登録)
    // Model は AccountViewModels.cs の RegisterViewModel
    public ActionResult Create()
    {
      return View();
    }

    // POST: Users/Create(新規ユーザー作成・登録)
    // Model は AccountViewModels.cs の RegisterViewModel
    [HttpPost]
    [ValidateAntiForgeryToken]
    public async Task<ActionResult> 
                        Create(RegisterViewModel model)
    {
      // PasswordValidator による判定の結果は ModelState
      // には反映されないので注意(下記 result で判定)
      if (ModelState.IsValid)
      {
        // ユーザー入力のメールアドレスを UserName, Email
        // プロパティに設定して ApplicationUser を生成
        var user = new ApplicationUser {
                            UserName = model.Email,
                            Email = model.Email };

        // 上の ApplicationUser とユーザー入力のパスワ
        // ードで新規ユーザーを作成・登録
        var result = await UserManager.
                     CreateAsync(user, model.Password);

        // ユーザー作成・登録の成否を result.Succeeded で
        // 判定。PasswordValidator の判定結果も result に
        // 反映される
        if (result.Succeeded)
        {
          // 登録に成功したら Users/Index にリダイレクト
          return RedirectToAction("Index", "Users");
        }
        // result.Succeeded が false の場合 ModelSate にエ
        // ラー情報を追加しないとエラーメッセージが出ない。
        // AccountController と同様に AddErrors メソッドを
        // 定義して利用(一番下に定義あり)
        AddErrors(result);
      }

      // ユーザー登録に失敗した場合、登録画面を再描画
      return View(model);
    }

    // GET: Users/Edit/Id(指定 Id のユーザー情報の更新)
    // ここで更新できるのは UserName, Email, パスワード
    // のみ。
    // Model は上に定義した EditViewModel
    public async Task<ActionResult> Edit(string id)
    {
      if (id == null)
      {
        return new HttpStatusCodeResult(
                        HttpStatusCode.BadRequest);
      }

      var target = await UserManager.FindByIdAsync(id);

      if (target == null)
      {
        return HttpNotFound();
      }

      EditViewModel model = 
        new EditViewModel() { Email = target.Email };

      return View(model);
    }

    // POST: Users/Edit/Id(指定 Id のユーザー情報の更新)
    // ここで更新できるのは UserName, Email, パスワード
    // のみ。
    // UserName をソルトに使っていてパスワードだけもしくは
    // UserName だけを更新するのは NG かと思っていたが問題
    // なかった。(実際どのように対処しているかは不明)
    // Model は上に定義した EditViewModel
    [HttpPost]
    [ValidateAntiForgeryToken]
    public async Task<ActionResult> 
                  Edit(string id, EditViewModel model)
    {
      if (id == null)
      {
        return new HttpStatusCodeResult(
                        HttpStatusCode.BadRequest);
      }

      if (ModelState.IsValid)
      {
        var target = await UserManager.FindByIdAsync(id);
        target.Email = model.Email;
        target.UserName = model.Email;

        // ユーザーが新パスワードを入力した場合はパス
        // ワードも更新する
        if (!string.IsNullOrEmpty(model.Password))
        {
          // PasswordValidator による検証
          var resultPassword = 
              await UserManager.PasswordValidator.
                    ValidateAsync(model.Password);

          if (resultPassword.Succeeded)
          {
            // 検証 OK の場合、入力パスワードを hash
            var hashedPassword = 
                UserManager.PasswordHasher.
                HashPassword(model.Password);
            target.PasswordHash = hashedPassword;
          }
          else
          {
            // 検証 NG の場合 ModelSate にエラー情報を
            // 追加して編集画面を再描画
            AddErrors(resultPassword);
            return View(model);
          }
        }

        var resultUpdate = 
          await UserManager.UpdateAsync(target);

        if (resultUpdate.Succeeded)
        {
          // 更新に成功したら Users/Index にリダイレクト
          return RedirectToAction("Index", "Users");
        }
        AddErrors(resultUpdate);
      }

      // 更新に失敗した場合、編集画面を再描画
      return View(model);
    }

    // GET: Users/Delete/Id(指定 Id のユーザーを削除)
    // 階層更新が行われているようで、ロールがアサインされて
    // いるユーザーも削除可能。
    // Model は ApplicationUser
    public async Task<ActionResult> Delete(string id)
    {
      if (id == null)
      {
        return new HttpStatusCodeResult(
                        HttpStatusCode.BadRequest);
      }

      var target = await UserManager.FindByIdAsync(id);

      if (target == null)
      {
        return HttpNotFound();
      }

      return View(target);
    }

    // POST: Users/Delete/Id(指定 Id のユーザーを削除)
    // Model は ApplicationUser
    // 上の Delete(string id) と同シグネチャのメソッド
    // は定義できないので、メソッド名を変えて、下のよう
    // に ActionName("Delete") を設定する
    [HttpPost, ActionName("Delete")]
    [ValidateAntiForgeryToken]
    public async Task<ActionResult> 
                        DeleteConfirmed(string id)
    {
      if (id == null)
      {
        return new HttpStatusCodeResult(
                        HttpStatusCode.BadRequest);
      }

      var target = await UserManager.FindByIdAsync(id);

      if (target == null)
      {
        return HttpNotFound();
      }

      // ロールがアサインされているユーザーも以下の一行で
      // 削除可能。内部で階層更新が行われているらしい。
      var result = await UserManager.DeleteAsync(target);

      if (result.Succeeded)
      {
        // 削除に成功したら Users/Index にリダイレクト
        return RedirectToAction("Index", "Users");
      }
      AddErrors(result);

      return View(target);
    }

    protected override void Dispose(bool disposing)
    {
      if (disposing)
      {
        if (_userManager != null)
        {
          _userManager.Dispose();
          _userManager = null;
        }
      }

      base.Dispose(disposing);
    }

    // ModelSate にエラー情報を追加するためのヘルパメソッド
    private void AddErrors(IdentityResult result)
    {
      foreach (var error in result.Errors)
      {
        ModelState.AddModelError("", error);
      }
    }
  }
}

上のコードは MSDN ライブラリに書いてある非同期版のメソッドを使っていますが、同期版も拡張メソッドとして定義されているようです。ケースバイケースでどちらが適切かを考えて使い分けた方が良いかもしれません。

View はコントローラをベースにスキャフォールディング機能を利用して自動生成できます。Visual Studio でアクションメソッドのコードを右クリックして[ビューを追加(D)...]を選ぶと、以下の画像のダイアログが表示されます。

View の作成

ここで Template と Model class を設定して[Add]ボタンをクリックすれば View は自動生成されます。

Data context class は必ず空白にしてください。余計な設定をすると余計なコードが自動生成されて "Multiple object sets per type are not supported." というエラーになると思います。

Tags:

MVC

ASP.NET の ID オブジェクト

by WebSurfer 2014年1月20日 16:36

ASP.NET Web Forms アプリケーションの Page 内では、以下の 3 つのプロパティ/メソッドで ID オブジェクト(WindowsIdentity または GenericIdentity)を取得できます。

それぞれどのように違うかを調べましたので、備忘録として書いておきます。


HttpRequest.LogonUserIdentity

現在 IIS が HTTP 要求を受けているユーザーの WindowsIdentity(Windows ユーザーを表す)オブジェクトを取得します。

匿名アクセス(Page.User.Identity.IsAuthenticated が false)の場合は常に IUSR となります。IUSR とは、匿名認証が有効化されている場合は常に IIS によって使用される既定の ID です。

ログイン済みユーザー(Page.User.Identity.IsAuthenticated が true)の場合は認証方式によって異なり、以下の通りとなります。

  • フォーム認証:ワーカープロセス(例:IIS7 では NETWORK SERVICE)
  • Windows 認証:ログインユーザーの Windows アカウント

ASP.NET 偽装の有効・無効には影響を受けず、常に上記の通りとなります。


WindowsIdentity.GetCurrent

ASP.NET 偽装が無効になっている場合は、ワーカープロセスを実行しているアカウント(IIS7 では NETWORK SERVICE)の WindowsIdentity オブジェクトを取得します。

ASP.NET 偽装が有効になっている場合は、偽装の設定方法、認証方式、匿名アクセスかログイン済みかによって、取得される WindowsIdentity オブジェクトは異なります(「偽装」しているだけで、実際にワーカープロセスを実行しているアカウントは変わらないのかもしれません・・・未確認です)。

web.config での偽装の設定を、単純に <identity impersonate="true" /> とした場合には以下のようになります。

フォーム認証

  • 匿名アクセス:IUSR
  • ログイン済み:ワーカープロセス(例:IIS7 では NETWORK SERVICE)

Windows 認証

  • 匿名アクセス:IUSR
  • ログイン済み:ログインユーザーの Windows アカウント

上記の偽装の設定に userName 属性、password 属性の設定を追加し、特定の Windows ユーザーアカウントを偽装した場合は、認証方式や認証済みか否かに関わらず、常に userName 属性に設定したユーザーアカウントになります。


Page.User.Identity

現在ページ要求を行っているユーザーを表す ID オブジェクトを取得します。

Page.User プロパティは、Windows 認証が有効になっている場合は WindowsPrincipal を、Windows 認証が無効の場合は RolePrincipal(ロール メンバシップを含む現在の HTTP 要求のセキュリティ情報)を取得します。

そして、WindowsPrincipal.Identity からは WindowsIdentity オブジェクトが、RolePrincipal.Identity からは GenericIdentity(標準ユーザーを表す)が取得されます。

ただし、それらの中身は ASP.NET が書き換えており、特に Name は、匿名アクセスの場合は IUSR ではなく空文字になること、フォーム認証のログイン済みユーザーの場合は Windows アカウント名ではなくフォーム認証のユーザー ID となる点に注意してください。

具体的には、IsAuthenticated, AuthenticationType, Name プロパティは以下の通りとなります。

フォーム認証、匿名アクセス

  • IsAuthenticated: false
  • AuthenticationType:(空文字)
  • Name:(空文字)

フォーム認証、ログイン済み

  • IsAuthenticated: true
  • AuthenticationType: Forms
  • Name: フォーム認証のユーザー ID

Windows 認証、匿名アクセス

  • IsAuthenticated: false
  • AuthenticationType:(空文字)
  • Name:(空文字)

Windows 認証、ログイン済み

  • IsAuthenticated: true
  • AuthenticationType: Negotiate
  • Name: ログインユーザーの Windows アカウント

Tags:

ASP.NET

About this blog

2010年5月にこのブログを立ち上げました。主に ASP.NET Web アプリ関係の記事です。

Calendar

<<  2024年4月  >>
31123456
78910111213
14151617181920
21222324252627
2829301234
567891011

View posts in large calendar