WebSurfer's Home

トップ > Blog 1   |   ログイン
APMLフィルター

GridView と jQuery UI DatePicker

by WebSurfer 2014年10月26日 15:47

ASP.NET の GridView で jQuery UI の Datepicker を使用する例の紹介です。

GridView に jQuery UI の Datepicker

GridView と組み合わせるなら Ajax Control Toolkit の CalendarExtender を使う方が簡単で、かつ 日付表示の日本語対応 もやりやすいと思いますが、外観の統一を図るなどの理由で jQuery UI の Datapicker を使用したい場合があると思います。

その場合、どのように GridView 内で Datapicker を表示する TextBox を探して、その jQuery オブジェクトを取得し、それに datepicker() メソッドを適用するかを書きます。

通常、GridView では編集モードになった行に TextBox を表示してユーザー入力を受け付けるようにします。その時に datepicker() メソッドを当該 TextBox に適用すればいいわけです。

編集モードになった行は GridView.EditIndex プロパティで判定できますが、Page.Load のタイミングでは早すぎて判定できません。

GridView.RowEditing のタイミングでは、ユーザー入力用の TextBox が生成されていないので FindControl では取得できず、このタイミングでもダメです。

GridView.RowCreated のタイミングでは、最終的な TextBox.ClientID が取得できないので、これまたダメです。(このタイミングでは TextBox.ClientID にはまだ名前つきコンテナの id が付与されておらず TextBox1_x のようになります。最終的な TextBox.ClientID が取得できないと、クライアントスクリプトでその jQuery オブジェクトを取得できません)

GridView.PreLender のタイミングなら、編集モードになっているか否かおよび編集モードになっている行のインデックスは正しく判定できます。最終的な TextBox.ClientID も取得できます。

GridView の[編集]ボタンクリックでポストバックされた際に、GridView.PreLender イベントのハンドラで編集モードになっている行の中の Datapicker を適用する TextBox を探し、その ClientID を取得し、RegisterClientScriptBlock メソッド を使って当該 TextBox に datepicker() メソッドを適用するスクリプトを登録してやることで Datapicker を表示することができます。

以下のコードの GridView1_PreRender イベントハンドラののコードような感じです。GridView で[編集]ボタンをクリックして表示される TextBox にフォーカスを当てると、上の画像のように Datapicker が表示されます。

<%@ Page Language="C#" %>

<!DOCTYPE html PUBLIC "-//W3C//DTD XHTML 1.0 Transitional//EN"
 "http://www.w3.org/TR/xhtml1/DTD/xhtml1-transitional.dtd">

<script runat="server">    
  protected void GridView1_PreRender(object sender, EventArgs e)
  {
    int index = GridView1.EditIndex;

    if (index >= 0)
    {
      TextBox tb = 
        (TextBox)GridView1.Rows[index].FindControl("TextBox1");

      if (tb != null)
      {
        ClientScriptManager cs = Page.ClientScript;
        Type cstype = this.GetType();
        string csname = "jQueryUiDatepicker";

        if (!cs.IsClientScriptBlockRegistered(cstype, csname))
        {
          string cstext = "$(function () { $('#" 
              + tb.ClientID + "').datepicker(); });";

          cs.RegisterClientScriptBlock(
              cstype, 
              csname, 
              cstext, 
              true);
        }
      }
    }
  }
</script>

<html xmlns="http://www.w3.org/1999/xhtml">
<head runat="server">
  <title>jQuery UI Datepicker in GridView</title>
  <script src="Scripts/jquery.js" type="text/javascript">
  </script>
  <script src="Scripts/jquery-ui.js" type="text/javascript">
  </script>
  <link href="css/jquery-ui.css" rel="stylesheet" type="text/css" />
</head>
<body>
  <form id="form1" runat="server">
  <asp:SqlDataSource ID="SqlDataSource1" runat="server" 
    ConnectionString="<%$ ConnectionStrings:Northwind %>" 
    SelectCommand="SELECT TOP 10 
      [OrderID], [CustomerID], [ShippedDate] 
      FROM [Orders]" 
    UpdateCommand="UPDATE [Orders] 
      SET [CustomerID] = @CustomerID, 
          [ShippedDate] = @ShippedDate 
      WHERE [OrderID] = @OrderID">
    <UpdateParameters>
      <asp:Parameter Name="CustomerID" Type="String" />
      <asp:Parameter Name="ShippedDate" Type="DateTime" />
      <asp:Parameter Name="OrderID" Type="Int32" />
    </UpdateParameters>
  </asp:SqlDataSource>

  <asp:GridView ID="GridView1" 
    runat="server" 
    AutoGenerateColumns="False" 
    DataKeyNames="OrderID" 
    DataSourceID="SqlDataSource1" 
    OnPreRender="GridView1_PreRender">
    <Columns>
      <asp:CommandField ShowEditButton="True" />
      <asp:BoundField DataField="OrderID" 
        HeaderText="OrderID" 
        InsertVisible="False" 
        ReadOnly="True" 
        SortExpression="OrderID" />
      <asp:BoundField DataField="CustomerID" 
        HeaderText="CustomerID" 
        SortExpression="CustomerID" />
      <asp:TemplateField HeaderText="ShippedDate" 
        SortExpression="ShippedDate">
        <EditItemTemplate>
          <asp:TextBox ID="TextBox1" 
            runat="server" 
            Text='<%# Bind("ShippedDate") %>'>
          </asp:TextBox>
        </EditItemTemplate>
        <ItemTemplate>
          <asp:Label ID="Label1" 
            runat="server" 
            Text='<%# Bind("ShippedDate") %>'>
          </asp:Label>
        </ItemTemplate>
      </asp:TemplateField>
    </Columns>
  </asp:GridView>
  </form>
</body>
</html>

サーバー側のコードで TextBox.ClientID を取得してピンポイントなスクリプトを設定しなくても、クライアント側で jQuery のセレクタで当該 TextBox を探して、それに datepicker() 適用する方が簡単ですが、ClientID の命名規則が変わるとうまくいかなくなる可能性があります。

そのリスクが許容できるのであれば、GridView1_PreRender イベントハンドラに代えて、以下のようなクライアントスクリプトを使っても同等なことが可能です。

<script type="text/javascript">
//<![CDATA[
  $(function () { 
    $('#<%=GridView1.ClientID%> input:text[id*=TextBox1]')
      .datepicker(); 
  });
//]]>
</script>

Tags: , ,

JavaScript

Table Drag and Drop jQuery Plugin

by WebSurfer 2012年11月11日 13:27

マウスによるドラッグ&ドロップで table の行を入れ替える jQuery プラグイン を GridView に適用してみました。

Table Drag and Drop JQuery plugin

プラグインのダウンロード先とその使い方の詳しい説明は Table Drag and Drop JQuery plugin を見てください。

ブラウザ上で table の行を入れ替えるだけであれば、目的の table 要素を初期化するだけで可能です。例えば、以下のように、table-1 という id を持つ table 要素にプラグインを適用すれば、それだけでマウスよる行の移動が可能になります。

<script type="text/javascript">
$(document).ready(function() {
    // Initialise the table
    $("#table-1").tableDnD();
});
</script>

しかしながら、これだけではクライアント側で行の入れ替えができるだけで、あまり役には立ちません。普通は入れ替えた結果をサーバー側で取得して、何らかの処置を行う必要があると思います。

入れ替えた結果を取得するために serialise() というメソッドが用意されています。これを以下のように適用すると table-1[]=rowId1&table-1[]=rowId2&table-1[]=rowId3... という並び順の文字列を取得して alert に表示します。この文字列で、table-1 はプラグインを適用する table の id です。rowId1, rowId2, rowId3... は tr 要素の id です。table の id に [] が追加されているのは、php での処置を考えてのことのようです。

$('#table-1').tableDnD({
    onDrop: function(table, row) {
        alert($.tableDnD.serialize());
    }
});

serialise() メソッドで取得した文字列を、行をドロップしたタイミングでサーバーに送信すれば、サーバーでの処置が可能になります。以下に GridView を使ったサンプルコードを書いてみました。jQuery Ajax を利用して文字列を web サービスに送信し、それを編集してクライアントに戻しています。

GridView にプラグインを適用する場合、(1) table の id は ClientID でなければならないこと、(2) tr 要素に id を設定しなければならないことに注意してください。

サンプルコードを実際に動かして試せるよう 実験室 にアップしましたので、興味のある方は試してみてください。

(1) aspx ページ (149-GridViewAndTableDnD2.aspx)

<%@ Page Title="" Language="C#" 
  MasterPageFile="~/TestMasterPage.master" %>
<%@ Import Namespace="System.Data" %>

<script runat="server">
  // データソース用の DataTable を作成
  protected DataTable CreateDataTable()
  {
    DataTable dt = new DataTable();
    DataRow dr;

    dt.Columns.Add(new DataColumn("ID", typeof(Int32)));
    dt.Columns.Add(new DataColumn("Name", typeof(string)));
    dt.Columns.Add(new DataColumn("Price", typeof(Int32)));
    dt.Columns.Add(new DataColumn("Qty", typeof(Int32)));
    dt.Columns.Add(new DataColumn("Amount", typeof(Int32)));
    dt.Columns.Add(new DataColumn("Note", typeof(string)));

    for (int i = 0; i < 10; i++)
    {
      dr = dt.NewRow();
      dr["ID"] = i;
      dr["Name"] = "Name_" + i.ToString();
      dr["Price"] = 123000 * (i + 1);
      dr["Qty"] = (i + 1) * 20;
      dr["Amount"] = 123000 * (i + 1) * (i + 1);
      dr["Note"] = "Note_" + i.ToString();
      dt.Rows.Add(dr);
    }
    return dt;
  }

  protected void Page_Load(object sender, EventArgs e)
  {
    if (!IsPostBack)
    {
      GridView1.DataSource = CreateDataTable();
      GridView1.DataBind();
    }
  }

  // tr 要素に id を設定。serialise() メソッドは id の
  // 値を順に取得して並び順の文字列を生成する。
  protected void GridView1_RowDataBound(
    object sender, GridViewRowEventArgs e)
  {
    if (e.Row.RowType == DataControlRowType.Header)
    {
      e.Row.Attributes["id"] = "row_header";
    }
    if (e.Row.RowType == DataControlRowType.DataRow)
    {
      DataRowView drv = (DataRowView)e.Row.DataItem;
      e.Row.Attributes["id"] =
        "row_" + ((int)drv["ID"]).ToString();
    }
  }
</script>

<asp:Content ID="Content1" 
  ContentPlaceHolderID="head" 
  Runat="Server">
  <script src="../Scripts/jquery-1.4.1.min.js" 
    type="text/javascript">
  </script>
  <script src="../Scripts/jquery.tablednd.js" 
    type="text/javascript">
  </script>
  <script type="text/javascript">
  //<![CDATA[
  $(document).ready(function () {

    $("#<%=GridView1.ClientID%>").tableDnD({
      onDrop: function (table, row) {
        $.ajax({
          type: "POST",
          url: "149-GridViewAndTableDnD.asmx/GetResult2",

          // serialize() で取得できる並び順の文字列は
          // <クライアントID>[]=<tr 要素の id>&... と
          // なる。なので、<クライアントID>[] という
          // 文字列も一緒にサーバーに送信しておく。
          // 2013/1/3 正しい JSON 文字列になるよう修正。
          data: '{"clientId":"<%=GridView1.ClientID%>[]",' +
                  '"data":"' + $.tableDnD.serialize() + '"}',

          // JSON の受け渡しには必須
          contentType: "application/json; charset=utf-8",

          dataFilter: function (data) {
            var msg = "";

            // ブラウザの native JASON パーサがあれ
            // ばそれを使う(セキュリティ対策)。
            if (typeof (JSON) !== 'undefined' &&
              typeof (JSON.parse) === 'function') {
              msg = JSON.parse(data);
            } else {
              msg = eval('(' + data + ')');
            }

            // .NET 3.5 で追加された d パラメータの処置
            if (msg.hasOwnProperty('d')) {
              return msg.d;
            } else {
              return msg;
            }
          },

          success: function (data) {
            $('#AjaxResult').empty();
            $('#AjaxResult').append('サーバーの応答<br />');
            $.each(data, function (index, data) {
              $('#AjaxResult').append(data + '<br />');
            });
          },

          error: function (jqXHR, textStatus, errorThrown) {
            $('#AjaxResult').text('Status: ' + textStatus +
              ', Error: ' + errorThrown);
          }
        });
      }
    });

  });
  //]]>
  </script>
</asp:Content>

<asp:Content ID="Content2" 
  ContentPlaceHolderID="ContentPlaceHolder1" 
  Runat="Server">
  <div id="AjaxResult" style="padding: 4px;
    border-color: silver; border-width: 1px; 
    border-style: solid; float: right">
    <h3>Ajax result</h3>
    <p>行を入れ替えた結果が表示されます。</p>
  </div>
  <asp:GridView ID="GridView1" runat="server" 
    OnRowDataBound="GridView1_RowDataBound">
  </asp:GridView>
</asp:Content>

(2) マスターページ (TestMasterPage.master)

<%@ Master Language="C#" %>

<!DOCTYPE html PUBLIC "-//W3C//DTD XHTML 1.0 Transitional//EN" 
"http://www.w3.org/TR/xhtml1/DTD/xhtml1-transitional.dtd">

<script runat="server">

</script>

<html xmlns="http://www.w3.org/1999/xhtml">
<head runat="server">
    <title>WebSurfer's Home - 実験室</title>
    <asp:ContentPlaceHolder id="head" runat="server">
    </asp:ContentPlaceHolder>
</head>
<body>
    <form id="form1" runat="server">
    <div>
        <asp:ContentPlaceHolder id="ContentPlaceHolder1" 
        runat="server">
        
        </asp:ContentPlaceHolder>
    </div>
    </form>
</body>
</html>

(3) Web サービス (149-GridViewAndTableDnD.asmx)

using System.Web;
using System.Web.Services;
using System.Web.Services.Protocols;
using System.Collections.Generic;
using System.Collections.Specialized;

[WebService(Namespace = "http://tempuri.org/")]
[WebServiceBinding(ConformsTo = WsiProfiles.BasicProfile1_1)]
[System.Web.Script.Services.ScriptService]
public class _149_GridViewAndTableDnD: WebService 
{
    [WebMethod]
    public string[] GetResult2(string clientId, string data)
    {
        string[] items = data.Split(new char[] { '&' });
        NameValueCollection nameValue = 
            new NameValueCollection();

        for (int i = 0; i < items.Length; i++)
        {
            string[] nv = items[i].Split(new char[] { '=' });
            nameValue.Add(nv[0], nv[1]);
        }
        
        // キーが clientId の値の配列を返す。
        return nameValue.GetValues(clientId);
    }
}

Tags: ,

JavaScript

リストコントロール上の選択結果を取得

by WebSurfer 2012年11月9日 00:28

注意:
DOM Level 3 Events がサポートされていない IE8 以前に対応するには、下の「2013/2/7 追加」に書いた対応が必要です。

ASP.NET のリストコントロール DropDownList, ListBox, RadioButtonList, CheckBoxList において、ユーザーが選択した ListItem に設定された Value プロパティや Text プロパティの値を、クライアント側で取得する方法です。
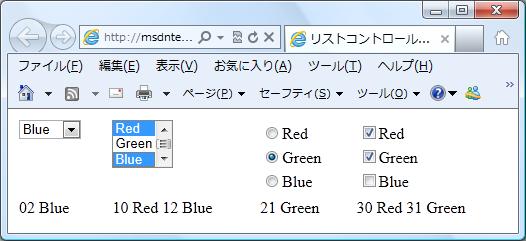
ListItem の Text プロパティの値

クライアント側で取得するので、ASP.NET がサーバーコントロールから生成した html コードがどのようになっているかを把握する必要があります。

DropDownList と ListBox からレンダリングされる html コードは、select 要素と option 要素で構成されます。ListItem の Value と Text は option 要素の value 属性と内部 HTML として設定されます。

RadioButtonList と CheckBoxList からレンダリングされる html コードは、input 要素と label 要素で構成されます。ListItem の Value は input 要素の value 属性として、Text は label 要素の内部 HTML として設定されます。(2012/11/10 追記: .NET 3.5 の CheckBoxList には問題があります。下の注記参照)

DropDownList, ListBox, RadioButtonList, CheckBoxList から生成された html コードの詳細は 実験室 のページのソースを見てください。下に提示したサンプルを実際に動かして試せるようしてあります。

クライアントスクリプトは JavaScript を使用することになりますが、JavaScript だけでは自分には難しいので、jQuery のセレクタの助けを借ります。

JavaScript + jQuery のサンプルコードは JQUERY API のページにもあります。.change() あたりが参考になるかもしれません。

一応、以下のようなサンプルコードを書いてみました。実験室 で実際に動かせます。

<%@ Page Language="C#" %>

<!DOCTYPE html PUBLIC "-//W3C//DTD XHTML 1.0 Transitional//EN" 
"http://www.w3.org/TR/xhtml1/DTD/xhtml1-transitional.dtd">

<script runat="server">

</script>

<html xmlns="http://www.w3.org/1999/xhtml">
<head runat="server">
  <title>リストコントロール上の選択結果を取得</title>
  <script src="Scripts/jquery-1.4.1.js" type="text/javascript">
  </script>
  <script type="text/javascript">
  //<![CDATA[
    $(document).ready(function () {

      $("#DropDownList1").change(function () {
        var str = $("#DropDownList1 option:selected").val() +
          " " + 
          $("#DropDownList1 option:selected").text();
          $("#Div1").text(str);
        });

        $("#ListBox1").change(function () {
          var str = "";
          $("#ListBox1 option:selected").each(function () {
            str += $(this).val() + " " + 
            $(this).text() + " ";
          });
          $("#Div2").text(str);
        });

        $("#RadioButtonList1").change(function () {
          var str = 
            $("#RadioButtonList1 input:checked").val() +
            " " +
            $("#RadioButtonList1 input:checked + label").text();
          $("#Div3").text(str);
        });

        $("#CheckBoxList1").change(function () {
          var str = "";
          $("#CheckBoxList1 input:checked").each(function () {
            str += $(this).val() + " " +
              $(this).next().text() + " ";
          });
          $("#Div4").text(str);
        });
      });
  //]]>
  </script>
</head>
<body>
  <form id="form1" runat="server">
  <table style="width: 500px;">
    <tr>
      <td style="vertical-align: top;">
        <asp:DropDownList id="DropDownList1" 
          runat="server">
          <asp:ListItem Value="00" Text="Red" />
          <asp:ListItem Value="01" Text="Green" />
          <asp:ListItem Value="02" Text="Blue" />
        </asp:DropDownList>
      </td>
      <td style="vertical-align: top;">
        <asp:ListBox id="ListBox1" 
          Rows="3" 
          SelectionMode="Multiple" 
          runat="server">
          <asp:ListItem Value="10" Text="Red" />
          <asp:ListItem Value="11" Text="Green" />
          <asp:ListItem Value="12" Text="Blue" />
        </asp:ListBox>    
      </td>
      <td style="vertical-align: top;">
        <asp:RadioButtonList id="RadioButtonList1" 
          runat="server">
          <asp:ListItem Value="20" Text="Red" />
          <asp:ListItem Value="21" Text="Green" />
          <asp:ListItem Value="22" Text="Blue" />
        </asp:RadioButtonList>
      </td>
      <td style="vertical-align: top;">
        <asp:CheckBoxList id="CheckBoxList1" 
          runat="server">
          <asp:ListItem Value="30" Text="Red" />
          <asp:ListItem Value="31" Text="Green" />
          <asp:ListItem Value="32" Text="Blue" />
        </asp:CheckBoxList>
      </td>
    </tr>
    <tr>
      <td style="vertical-align: top;">
        <div id="Div1"></div>
      </td>
      <td style="vertical-align: top;">
        <div id="Div2"></div>
      </td>
      <td style="vertical-align: top;">
        <div id="Div3"></div>
      </td>
      <td style="vertical-align: top;">
        <div id="Div4"></div>
      </td>
    </tr>
  </table>
  </form>
</body>
</html>

----- 2012/11/10 注記追加 -----

.NET 3.5 では、CheckBoxList からレンダリングされる html コードで、input 要素に value 属性が設定されません。その状態で、上記 jQuery のコードで value を取得すると "on" となります。(注: MDN のドキュメント <input type="checkbox"> によると "value 属性が省略された場合は、チェックボックスの既定値は on " とのことです)

実験室は .NET 3.5 なので試してみてください。CheckBoxList のみ on Red とか on Green と表示されるはずです。.NET 4 では問題ありません。上の画像は .NET 4 のものです。

IE8 以前、IE9 でも互換モードでは、ListBox と CheckBoxList をクリックしても、最初は無反応となります。理由は、最初に表示されたときはイベントにハンドラがアタッチされないからです。何度かクリックしているとアタッチされて反応するようになります。理由は不明。ちなみに、Firefox 16.0.2, Chrome 23.0.1271.64 m Safari 5.1.7, Opera 12.02 は問題なかったです。

----- 2013/2/7 追加 -----

先に、IE9 では期待通り動くが IE8 以前では、ListBox と CheckBoxList が、最初のうち無反応と書きました。違いは何かを考えてみると、IE9 では DOM Level 3 Events がサポートされているのに対し、IE8 以前ではサポートされてないことを思い出しました。

試しに、addEventListener メソッドと attachEvent メソッドを使い分けてハンドラ(リスナー)をアタッチするようにしてみました。

その結果、ListBox は期待通り動くようになったものの、RadioButtonList と CheckBoxList が全く無反応になってしまいました。(IE8 以前での話しです。IE9 は問題ありません)

Microsoft が公開しているドキュメント change | onchange event (Internet Explorer) によると、change イベントが発生する条件として以下の記述があります。(← Microsoft の記事はリンク切れになってしまいました。クリックすると MDN の記事 HTMLElement: change event に遷移しますが、それとは内容が異なります)

To invoke this event, do one of the following:

  1. Choose a different option in a select object using mouse or keyboard navigation.
  2. Alter text in the text area and then navigate out of the object.

ということは、RadioButtonList, CheckBoxList はそれぞれ input type=checkbox, input type=radio 要素なので、change イベントは発生しないということになります。

change イベントに代えて click イベントにリスナーをアタッチすることで RadioButtonList, CheckBoxList の選択を変更を捕捉できます。

以下のコードが対応版です。実験室 で実際に動かせます。

オリジナルとの違いは、(1) ListBox については、change イベントにリスナーをアタッチするのを jQuery 任せにせず自分でコードを書いて addEventListener メソッドと attachEvent メソッ ドを使い分けたこと、(2) RadioButtonList, CheckBoxList については、change イベントの代わりに click イベントにリスナーをアタッチしたことです。

なお、なぜ ListBox では jQuery によるリスナーのアタッチがうまくいかず、上記 (1) の操作が必要かは不明です。

<%@ Page Language="C#" %>

<!DOCTYPE html PUBLIC "-//W3C//DTD XHTML 1.0 Transitional//EN" 
"http://www.w3.org/TR/xhtml1/DTD/xhtml1-transitional.dtd">

<script runat="server">

</script>

<html xmlns="http://www.w3.org/1999/xhtml">
<head id="Head1" runat="server">
  <title>WebSurfer's Page - 実験室</title>
  <script src="Scripts/jquery-1.4.1.js" type="text/javascript">
  </script>
  <script type="text/javascript">
  //<![CDATA[
  $(document).ready(function () {
    $("#DropDownList1").change(function () {
      var str = $("#DropDownList1 option:selected").val() +
        " " +
        $("#DropDownList1 option:selected").text();
      $("#Div1").text(str);
    });

    function listenerForListBox() {
      var str = "";
      $("#ListBox1 option:selected").each(function () {
        str += $(this).val() + " " + $(this).text() + " ";
      });
      $("#Div2").text(str);
    }

    var element = document.getElementById("ListBox1");
    if (element.addEventListener) {
      element.addEventListener('change', 
                               listenerForListBox, false);
    } else if (element.attachEvent) {
      element.attachEvent('onchange', listenerForListBox);
    }

    $("#RadioButtonList1").click(function () {
      var str =
        $("#RadioButtonList1 input:checked").val() +
        " " +
        $("#RadioButtonList1 input:checked + label").text();
      $("#Div3").text(str);
    });

    $("#CheckBoxList1").click(function () {
      var str = "";
      $("#CheckBoxList1 input:checked").each(function () {
        str += $(this).val() + " " +
          $(this).next().text() + " ";
      });
      $("#Div4").text(str);
    });
  });
  //]]>
  </script>
</head>
<body>
  <form id="form1" runat="server">
  <table style="width: 500px;">
    <tr>
      <td style="vertical-align: top;">
        <asp:DropDownList id="DropDownList1" 
          runat="server">
          <asp:ListItem Value="00" Text="Red" />
          <asp:ListItem Value="01" Text="Green" />
          <asp:ListItem Value="02" Text="Blue" />
        </asp:DropDownList>
      </td>
      <td style="vertical-align: top;">
        <asp:ListBox id="ListBox1" 
          Rows="3" 
          SelectionMode="Multiple" 
          runat="server">
          <asp:ListItem Value="10" Text="Red" />
          <asp:ListItem Value="11" Text="Green" />
          <asp:ListItem Value="12" Text="Blue" />
        </asp:ListBox>    
      </td>
      <td style="vertical-align: top;">
        <asp:RadioButtonList id="RadioButtonList1" 
          runat="server">
          <asp:ListItem Value="20" Text="Red" />
          <asp:ListItem Value="21" Text="Green" />
          <asp:ListItem Value="22" Text="Blue" />
        </asp:RadioButtonList>
      </td>
      <td style="vertical-align: top;">
        <asp:CheckBoxList id="CheckBoxList1" 
          runat="server">
          <asp:ListItem Value="30" Text="Red" />
          <asp:ListItem Value="31" Text="Green" />
          <asp:ListItem Value="32" Text="Blue" />
        </asp:CheckBoxList>
      </td>
    </tr>
    <tr>
      <td style="vertical-align: top;">
        <div id="Div1"></div>
      </td>
      <td style="vertical-align: top;">
        <div id="Div2"></div>
      </td>
      <td style="vertical-align: top;">
        <div id="Div3"></div>
      </td>
      <td style="vertical-align: top;">
        <div id="Div4"></div>
      </td>
    </tr>
  </table>
  </form>
</body>
</html>

Tags: ,

JavaScript

About this blog

2010年5月にこのブログを立ち上げました。主に ASP.NET Web アプリ関係の記事です。

Calendar

<<  2024年4月  >>
31123456
78910111213
14151617181920
21222324252627
2829301234
567891011

View posts in large calendar