ユーザーがブラウザ上で GridView のセルをクリックすると、ポストバックされて、サーバ側のプログラムでクリックされたセルの位置を取得する方法です。
それだけでは面白くない(?)ので、データソースの列が動的に変化するとし、ヘッダを含めて LinkButton または Button で表示し、ページングを有効にするというシナリオです。
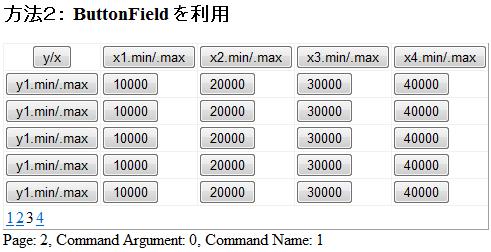
以下の画像のような感じです。これはページャーの 3 をクリックして 3 ページに移動し、ヘッダーを含めて上から 2 行目の 10000 をクリックした結果です。
アプリは以下のようにして作成します。こんなシナリオは普通ないので、役に立たないと言われるかもしれませんが(苦笑)
ページング
ページングのためのコードを自力で書くのはかなり大変です。ページングの機能を持つデータソースコントロールとデータバインドコントロールを組み合わせて使うのが現実的と思います。
ここでは、データソースコントロールに ObjectDataSource を使用し、DataTable を作成するメソッドと GridView(データバインドコントロール)の間を仲介してやることにします。
GridView の列の設定
データソースの列が動的に変化するという前提があります。
テキストで表示するなら、AutoGenerateColumns を true にすれば自動的に必要な列を生成してくれますが、LinkButton または Button を使って表示するという要件があるのでそうはいきません。
AutoGenerateColumns="False" としておき、Page.Load のイベントハンドラで DataTable から列情報を取得し、その情報をもとに ButtonField を初期化して、GridView に設定してやるという操作が必要です。
各行へのデータバインドは、ButtonField.DataTextField プロパティに DataColumn.Caption を設定しておけば、ObjectDataSource と GridView が自動で行ってくれます。
セル位置の設定・取得
クリックされたセルの列・行位置は、GridView.RowCommand イベントハンドラで、引数の GridViewCommandEventArgs オブジェクトの CommandName, CommandArgument プロパティから取得します。
列番号の取得には CommandName を利用します。そのためには、事前に CommandName に列番号を設定しておく必要があります。上記の「GridView の列の設定」の際に DataColumn.Ordinal プロパティから DataTable 内での列位置を取得し、ButtonField.CommandName プロパティに設定します。
行番号の取得には CommandArgument を使用します。CommandArgument にはデフォルトで行番号が設定されるので、事前の設定は不要です。
取得できる行番号は、ページングした場合、例えば1ページ目の n 行と、2ページ目の n 行とで同じになりますので注意してください。
ヘッダー行の変更
ここまでの処置では、まだヘッダーが普通のテキストのままです。これを LinkButton または Button で表示するようにします。
それには、GridView.RowCreated イベントのハンドラで、ヘッダーの Cell の内容を LinkButton または Button に書き換えてやります。
サンプルコード
<%@ Page Language="C#" %>
<%@ Import Namespace="System.Data" %>

<!DOCTYPE html PUBLIC "-//W3C//DTD XHTML 1.0 Transitional//EN"
"http://www.w3.org/TR/xhtml1/DTD/xhtml1-transitional.dtd">

<script runat="server">
  protected void GridView1_RowCreated(object sender, GridViewRowEventArgs e)
  {
    if (e.Row.RowType == DataControlRowType.Header)
    {
      TableCellCollection cells = e.Row.Cells;
      foreach (TableCell cell in cells)
      {
        string text = cell.Text;
        cell.Controls.Clear();
        //LinkButton button = new LinkButton();  // ハイパーリンク表示
        Button button = new Button();          // ボタン表示
        button.Text = text;
        button.CommandArgument = "-1";
        button.CommandName = cells.GetCellIndex(cell).ToString();
        cell.Controls.Add(button);
      }
    }
  }

  protected void GridView1_RowCommand(object sender, GridViewCommandEventArgs e)
  {
    // ページャーがクリックされた場合
    if (e.CommandName == "Page")
    {
      Label1.Text = String.Empty;
    }
    else
    {
      Label1.Text = "Page: " + GridView1.PageIndex.ToString() +
        ", Command Argument: " + e.CommandArgument.ToString() +
        ", Command Name: " + e.CommandName;
    }
  }

  protected void Page_Load(object sender, EventArgs e)
  {
    if (!Page.IsPostBack)
    {
      DataView view = (DataView)ObjectDataSource1.Select();
      DataTable table = view.Table;
      foreach (DataColumn column in table.Columns)
      {
        ButtonField field = new ButtonField();
        //field.ButtonType = ButtonType.Link;     // ハイパーリンク表示
        field.ButtonType = ButtonType.Button;   // ボタン表示
        field.HeaderText = column.Caption;
        field.DataTextField = column.Caption;
        field.CommandName = column.Ordinal.ToString();
        GridView1.Columns.Add(field);
      }
    }
  }
</script>

<html xmlns="http://www.w3.org/1999/xhtml">
<head runat="server">
  <title></title>
</head>
<body>
  <form id="form1" runat="server">
  <div>
    <h3>方法2: ButtonField を利用</h3>
    <asp:ObjectDataSource ID="ObjectDataSource1"
      runat="server"
      SelectMethod="CreateDataTable2"
      TypeName="PagingTest">
    </asp:ObjectDataSource>
    <asp:GridView ID="GridView1"
      runat="server"
      AllowPaging="True"
      DataSourceID="ObjectDataSource1"
      onrowcreated="GridView1_RowCreated"
      onrowcommand="GridView1_RowCommand"
      PageSize="5"
      AutoGenerateColumns="False"
      EnableViewState="True">
    </asp:GridView>
    <asp:Label ID="Label1" runat="server"></asp:Label>
  </div>
  </form>
</body>
</html>
ついでに、ObjectDataSource の TypeName, SelectMethod が参照しているクラス/メソッドもアップしておきます。
using System;
using System.Data;
using System.Configuration;
using System.Web;
using System.Web.Security;
using System.Web.UI;
using System.Web.UI.HtmlControls;
using System.Web.UI.WebControls;
using System.Web.UI.WebControls.WebParts;

public class PagingTest
{
  public static DataTable CreateDataTable2()
  {
    DataTable wktbl = new DataTable();
    DataRow wkrow;

    wktbl.Columns.Add("y/x");
    wktbl.Columns.Add("x1.min/.max");
    wktbl.Columns.Add("x2.min/.max");
    wktbl.Columns.Add("x3.min/.max");
    wktbl.Columns.Add("x4.min/.max");

    for (int i = 0; i < 20; i++)
    {
      wkrow = wktbl.NewRow();
      wkrow["y/x"] = "y1.min/.max";
      wkrow["x1.min/.max"] = "10000";
      wkrow["x2.min/.max"] = "20000";
      wkrow["x3.min/.max"] = "30000";
      wkrow["x4.min/.max"] = "40000";
      wktbl.Rows.Add(wkrow);
    }

    return wktbl;
  }
}