ADO.NET の DbProviderFactory クラスと DbConnection クラス, DbCommand クラスなどの抽象クラスを使ってデータベースにアクセスして操作するアプリの例を備忘録として書いておきます。

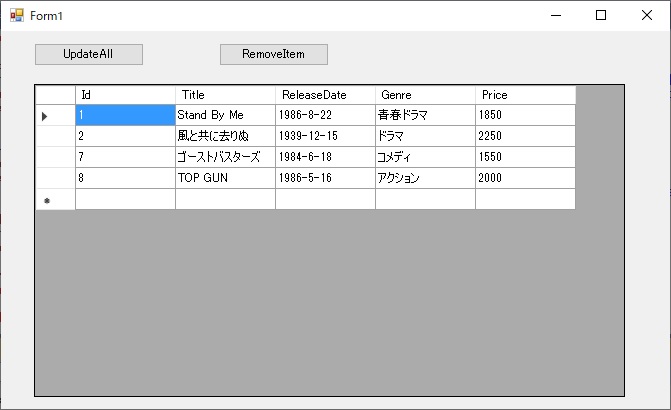
上の画像は、SQLite のテーブルのレコード一覧を DataGridView に表示し、ユーザーがそれを見て編集した後、編集結果をデータベースに書き戻す .NET Framework 4.8 の Windows Forms アプリです。
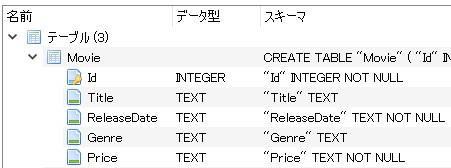
対象としたデータベースは以下の内容の SQLite の Movie テーブルです。

普通に作ると、SQLite 専用の SQLiteConnection, SQLiteCommand などを使うと思いますが、それらに代えて DbConnection, DbCommand などの抽象クラスと、DbProviderFactory の CreateConnection、CreateCommand メソッドなど使うようにします。
そうすると何のメリットがあるのかと言うと、例えば SQLite を SQL Server に変更する場合、ハードコーディングした SQLiteConnection, SQLiteCommand などを SqlConnection, SqlCommand などに書き換える必要はなく、app.config の接続文字列だけを SQL Server 用に書き換えれば移行できます。
まず DbProviderFactory の登録を行う必要がありますが、SQLite の場合は NuGet から System.Data.SQLite をインストールすると app.config に以下の DbProviderFactories 要素が追加されるのでこれを利用します。
<DbProviderFactories>
  <remove invariant="System.Data.SQLite.EF6" />
  <add name="SQLite Data Provider (Entity Framework 6)"
    invariant="System.Data.SQLite.EF6"
    description=".NET Framework Data Provider for SQLite (Entity Framework 6)"
    type="System.Data.SQLite.EF6.SQLiteProviderFactory, System.Data.SQLite.EF6" />
  <remove invariant="System.Data.SQLite" />
  <add name="SQLite Data Provider"
    invariant="System.Data.SQLite"
    description=".NET Framework Data Provider for SQLite"
    type="System.Data.SQLite.SQLiteFactory, System.Data.SQLite" />
</DbProviderFactories>
接続文字列とプロバイダ名も app.config から取得できるように、以下のように connectionStrings 要素を設定しておきます。
<connectionStrings>
  <add name="ConnectionInfo"
    connectionString="SQLite 用の接続文字列"
    providerName="System.Data.SQLite"/>
</connectionStrings>
Visual Studio のデザイン画面で、ツールボックスから Form に Button 2 つ、DataGridView、BindingSource をドラッグ&ドロップした後、以下のコードを記述します。コメントアウトしたコードが SQLiteConnection, SQLiteCommand, SQLiteDataAdapter, SQLiteCommandBuilder などを使ったもので、その下が DbProviderFactory を使用したものです。下のコードを実行した結果がこの記事の一番上の画像です。
using System;
using System.Data;
using System.Data.SQLite;
using System.Windows.Forms;
using System.Configuration;
using System.Data.Common;
using System.Configuration.Provider;

namespace WindowsFormsSQLite
{
    public partial class Form1 : Form
    {
        //private SQLiteDataAdapter adapter;
        // ↓↓↓
        private DbDataAdapter adapter;

        private DataTable table;

        public Form1()
        {
            InitializeComponent();

            this.dataGridView1.DataSource = this.bindingSource1;
        }

        private void Form1_Load(object sender, EventArgs e)
        {
            var connString = ConfigurationManager
                             .ConnectionStrings["ConnectionInfo"]
                             .ConnectionString;
            var selectQuery =
                "SELECT Id, Title, ReleaseDate, Genre, Price FROM Movie";

            //var connection = new SQLiteConnection(connString);
            //var command = new SQLiteCommand(selectQuery, connection);
            //this.adapter = new SQLiteDataAdapter();
            //this.adapter.SelectCommand = command;
            //_ = new SQLiteCommandBuilder(this.adapter);
            // ↓↓↓
            var providerName = ConfigurationManager
                               .ConnectionStrings["ConnectionInfo"]
                               .ProviderName;
            var factory = DbProviderFactories.GetFactory(providerName);
            var connection = factory.CreateConnection();
            connection.ConnectionString = connString;
            var command = connection.CreateCommand();
            command.CommandText = selectQuery;
            command.Connection = connection;
            this.adapter = factory.CreateDataAdapter();
            this.adapter.SelectCommand = command;
            var builder = factory.CreateCommandBuilder();
            builder.DataAdapter = this.adapter;

            this.table = new DataTable();
            this.adapter.Fill(this.table);
            this.bindingSource1.DataSource = this.table;

            this.components.Add(connection);
            this.components.Add(command);
        }

        private void Update_Click(object sender, EventArgs e)
        {
            this.adapter.Update(this.table);
        }

        private void Remove_Click(object sender, EventArgs e)
        {
            this.bindingSource1.RemoveCurrent();
        }
    }
}
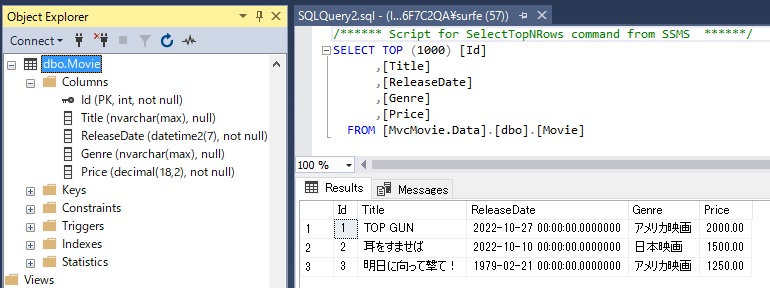
次に、SQLite のテーブルを下の画像の SQL Server のテーブルに変更する場合、どのようにするかを書きます。

System.Data.SqlClient を使う場合、そのプロパイダ情報は machine.config に登録済みのはずです。もし、登録されてなければ app.config の DbProviderFactories 要素に以下のように SQL Server 用のプロパイダ情報を追加してください。
<remove invariant="System.Data.SqlClient" />
<add name="SqlClient Data Provider"
  invariant="System.Data.SqlClient"
  description=".Net Framework Data Provider for SqlServer"
  type="System.Data.SqlClient.SqlClientFactory, System.Data,
    Version=2.0.0.0, Culture=neutral, PublicKeyToken=b77a5c561934e089" />
あとは、以下のように接続文字列とプロバイダ名の設定を SQL Server 用に差し替えるだけで済みます。connectionString のみでなく、providerName も SQL Server 用に変更しているところに注意してください。
<connectionStrings>
  <add name="ConnectionInfo"
    connectionString="SQL Server 用の接続文字列"
    providerName="System.Data.SqlClient"/>
</connectionStrings>
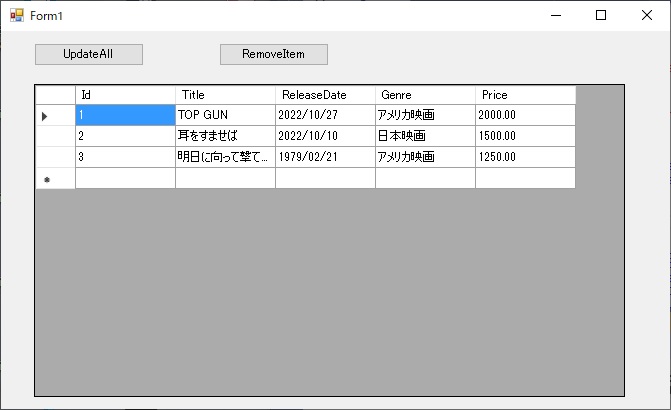
その上でアプリを実行すれば、SQL Server に接続されて以下の画像の通り Movie テーブルのレコード一覧が表示され、編集操作も同様に可能になります。

SQLite と SQL Server のテーブルにはデータの型の違いがありますが、
DbDataAdapter と DataTable を使う非接続型のアプリの場合は、その違いはプロバイダと DataTable が吸収してくれるようです。
ただ、上のようなことを考えなくても、SQL Server の場合は Visual Studio のデータソース構成ウィザードが利用できますので、それを使って作り直した方が簡単かつ確実かもしれません。ドラッグ&ドロップ操作だけで自力では一行もコードを書かずにアプリを作成できますので。
【2023/7/5 追記】
プロバイダを、System.Data.SqlClient に代えて Microsoft.Data.SqlClient とする場合について以下に追記します。
Microsoft.Data.SqlClient 用のプロバイダは machine.config には登録されてないので、Microsoft のドキュメント「SqlClientFactory の取得」に書いてあるように、app.config に DbProviderFactory の登録を行う必要があります。以下の通りです。
<add name="Microsoft SqlClient Data Provider"
  invariant="Microsoft.Data.SqlClient"
  description="Microsoft SqlClient Data Provider for SQL Server"
  type="Microsoft.Data.SqlClient.SqlClientFactory, Microsoft.Data.SqlClient,
        Version=5.0.0.0, Culture=neutral, PublicKeyToken=23ec7fc2d6eaa4a5" />
上の Version は、使用する Microsoft.Data.Sqlclient のバージョンと合わせる必要があるので注意してください。Microsoft.Data.Sqlclient は NuGet からインストールしますが、インストール後 Visual Studio のソリューションエクスプローラーの「参照」に Microsoft.Data.Sqlclient が追加されるので、そのバージョンに合わせてください。
あとは、接続文字列の設定の内 providerName を Microsoft.Data.Sqlclient 用に変更すれば OK です。
<add name="ConnectionInfo"
  connectionString="SQL Server 用の接続文字列"
  providerName="Microsoft.Data.SqlClient" />