WebSurfer's Home

トップ > Blog 1   |   ログイン
APMLフィルター

ASP.NET Core Identity 独自実装(その2)

by WebSurfer 2020年9月6日 16:29

先の記事「ASP.NET Core Identity 独自実装(その1)」と「Register, Login, Logout 機能の実装」の続きです。

ロール管理画面

先の記事では ASP.NET Core Identity のユーザー認証に用いるデータソースとカスタムプロバイダを作成し、それを用いてユーザー認証機能を実装しました。今回、ロール機能を追加しましたので、その方法などを備忘録として書いておきます。

先の記事「ASP.NET Core Identity 独自実装(その1)」の一番上に表示した画像を見てください。前回、その画像の Data Source, Data Access Layer レイヤーおよび Identity Store レイヤーの中のカスタムプロバイダ UserStore までは作成し、期待通りの動作をすることは確認しました。

今回、ロール機能を実現するためのカスタムプロバイダ RoleStore を実装し、先に作成したカスタムプロバイダ UserStore にロールによるアクセス制限のための機能を追加します。

(1) RoleStore クラスの実装

先に骨組みだけ作っておきましたが、それに中身を実装します。作成済みの UserStore のメソッドを参考にしました。

上位レイヤーにある RoleInManager がこのクラスに定義したメソッドを使って、先に作成済みの Data Access Layer を介して SQL Server の Role テーブルにアクセスし、ロールデータの作成、取得、削除などの操作を行います。

using System;
using System.Linq;
using System.Threading;
using System.Threading.Tasks;
using Microsoft.AspNetCore.Identity;
using Microsoft.EntityFrameworkCore;
using MvcIdCustom.Models;

namespace MvcIdCustom.DAL
{
    public class RoleStore : IRoleStore<Role>, 
                             IQueryableRoleStore<Role>
    {
        private DataContext db;

        public RoleStore(DataContext db)
        {
            this.db = db;
        }

        public void Dispose()
        {
            Dispose(true);
        }

        protected virtual void Dispose(bool disposing)
        {
            if (disposing)
            {
                if (db != null)
                {
                    db.Dispose();
                    db = null;
                }
            }
        }

        // IQueryableRoleStore<Role> のメンバーの Roles プロパティ
        public IQueryable<Role> Roles
        {
            get { return db.Roles.Select(r => r); }
        }

        // 同じロール名の二重登録の防止機能は上位レイヤーに組み込まれている
        public async Task<IdentityResult> CreateAsync(Role role, 
            CancellationToken cancellationToken = default)
        {
            cancellationToken.ThrowIfCancellationRequested();
            if (role == null) throw new ArgumentNullException(nameof(role));

            db.Add(role);

            int rows = await db.SaveChangesAsync(cancellationToken);

            if (rows > 0)
            {
                return IdentityResult.Success;
            }

            return IdentityResult.Failed(
                new IdentityError { Description = $"{role.Name} 登録失敗" });
        }

        // 同じロール名の二重登録の防止機能は上位レイヤーに組み込まれている
        public async Task<IdentityResult> UpdateAsync(Role role, 
            CancellationToken cancellationToken = default)
        {
            cancellationToken.ThrowIfCancellationRequested();
            if (role == null) throw new ArgumentNullException(nameof(role));

            db.Update(role);

            int rows = await db.SaveChangesAsync(cancellationToken);

            if (rows > 0)
            {
                return IdentityResult.Success;
            }

            return IdentityResult.Failed(
                new IdentityError { Description = $"{role.Name} 更新失敗" });
        }

        public async Task<IdentityResult> DeleteAsync(Role role, 
            CancellationToken cancellationToken = default)
        {
            cancellationToken.ThrowIfCancellationRequested();
            if (role == null) throw new ArgumentNullException(nameof(role));

            db.Remove(role);

            int rows = await db.SaveChangesAsync(cancellationToken);

            if (rows > 0)
            {
                return IdentityResult.Success;
            }

            return IdentityResult.Failed(
                new IdentityError { Description = $"{role.Name} 削除失敗" });
        }

        public Task<string> GetRoleIdAsync(Role role, 
            CancellationToken cancellationToken = default)
        {
            cancellationToken.ThrowIfCancellationRequested();
            if (role == null) throw new ArgumentNullException(nameof(role));

            return Task.FromResult(role.Id.ToString());
        }

        public Task<string> GetRoleNameAsync(Role role,
            CancellationToken cancellationToken = default)
        {
            cancellationToken.ThrowIfCancellationRequested();
            if (role == null) throw new ArgumentNullException(nameof(role));

            return Task.FromResult(role.Name);
        }

        public Task SetRoleNameAsync(Role role, 
            string roleName, 
            CancellationToken cancellationToken = default)
        {
            cancellationToken.ThrowIfCancellationRequested();
            if (role == null) throw new ArgumentNullException(nameof(role));
            if (string.IsNullOrEmpty(roleName)) 
                throw new ArgumentException("roleName");

            role.Name = roleName;

            return Task.CompletedTask;
        }

        public Task<string> GetNormalizedRoleNameAsync(Role role, 
            CancellationToken cancellationToken = default)
        {
            cancellationToken.ThrowIfCancellationRequested();
            if (role == null) throw new ArgumentNullException(nameof(role));

            return Task.FromResult(role.Name);
        }

        public Task SetNormalizedRoleNameAsync(Role role, 
            string normalizedName, 
            CancellationToken cancellationToken = default)
        {
            cancellationToken.ThrowIfCancellationRequested();
            if (role == null) throw new ArgumentNullException(nameof(role));
            if (string.IsNullOrEmpty(normalizedName))
                throw new ArgumentException("normalizedName");

            return Task.CompletedTask;
        }

        public async Task<Role> FindByIdAsync(string roleId, 
            CancellationToken cancellationToken = default)
        {
            cancellationToken.ThrowIfCancellationRequested();

            if (int.TryParse(roleId, out int id))
            {
                return await db.Roles.SingleOrDefaultAsync(r => r.Id == id, 
                    cancellationToken);
            }
            else
            {
                return await Task.FromResult<Role>(null);
            }
        }

        public async Task<Role> FindByNameAsync(string normalizedRoleName, 
            CancellationToken cancellationToken = default)
        {
            cancellationToken.ThrowIfCancellationRequested();
            if (string.IsNullOrEmpty(normalizedRoleName))
                throw new ArgumentException("normalizedRoleName");

            Role role = await db.Roles.SingleOrDefaultAsync(
                r => r.Name.Equals(normalizedRoleName.ToLower()), 
                cancellationToken);

            return role;
        }
    }
}

(2) UserStore クラスへの追加

ロールを使えるようにするには、先に作成した UserStore クラス に機能の追加を行う必要があります。

具体的には、以下のように IUserRoleStore<User> インターフェースを継承し、AddToRoleAsunc, GetRolesAsync, IsInRoleAsync, RemoveFromRoleAsync メソッドを実装します。

using System.Collections.Generic;
using System.Linq;
using System.Reflection.Metadata.Ecma335;
using System.Threading;
using System.Threading.Tasks;

namespace MvcIdCustom.DAL
{
    public class UserStore : IUserStore<User>, 
                             IUserPasswordStore<User>, 
                             IQueryableUserStore<User>, 
                             IUserRoleStore<User>       // 追加
    {

        // ・・・中略・・・

        // Visual Studio のテンプレートで「個別のユーザーアカウント」を
        // 選んで自動生成される AspNetUserRoles テーブルは UserId と
        // RoleId の 2 つのフィールドのみが含まれ、それが連結主キーにな
        // っているので UserId と RoleId の組み合わせが重複することはない。

        // 一方、このプロジェクトで作った UserRole テーブルは Id, UserId,
        // RoleId の 3 つのフィールドを持ち Id が主キーになっている。なの
        // で UserId と RoleId の組み合わせが重複できてしまう。以下のコード
        // では重複設定できないように考えた(つもり)

        public async Task AddToRoleAsync(User user, string roleName, 
            CancellationToken cancellationToken = default)
        {
            cancellationToken.ThrowIfCancellationRequested();
            if (user == null) throw new ArgumentNullException(nameof(user));
            if (string.IsNullOrEmpty(roleName)) 
                throw new ArgumentException("roleName");

            // roleName に該当する Role オブジェクトを取得
            var role = await db.Roles.SingleOrDefaultAsync(
                             role => role.Name.Equals(roleName), 
                             cancellationToken);

            // roleName という名前のロールは存在しないので何もせず return
            if (role == null) return;

            // UserRole テーブルの UserId と RoleId が user.Id と role.Id
            // と一致する UserRole オブジェクトを取得
            var userRole = await db.UserRoles.SingleOrDefaultAsync(
                                 userRole => userRole.UserId.Equals(user.Id) && 
                                             userRole.RoleId.Equals(role.Id),
                                 cancellationToken);

            // user は roleName という名前のロールには既にアサイン済みなので
            // 何もせず return
            if (userRole != null) return;

            userRole = new UserRole
            {
                UserId = user.Id,
                RoleId = role.Id
            };

            db.UserRoles.Add(userRole);
            await db.SaveChangesAsync(cancellationToken);
        }

        public async Task RemoveFromRoleAsync(User user, string roleName, 
            CancellationToken cancellationToken = default)
        {
            cancellationToken.ThrowIfCancellationRequested();
            if (user == null) throw new ArgumentNullException(nameof(user));
            if (string.IsNullOrEmpty(roleName)) 
                throw new ArgumentException("roleName");

            // roleName に該当する Role オブジェクトを取得
            var role = await db.Roles.SingleOrDefaultAsync(
                             role => role.Name.Equals(roleName), 
                             cancellationToken);

            // roleName という名前のロールは存在しないので何もせず return
            if (role == null) return;

            // UserRole テーブルの UserId と RoleId が user.Id と role.Id
            // と一致する UserRole オブジェクトを取得
            var userRole = await db.UserRoles.SingleOrDefaultAsync(
                                userRole => userRole.UserId.Equals(user.Id) &&
                                            userRole.RoleId.Equals(role.Id), 
                                cancellationToken);

            // user は roleName という名前のロールにはアサインされてないので
            // 何もせず return
            if (userRole == null) return;

            db.UserRoles.Remove(userRole);
            await db.SaveChangesAsync(cancellationToken);
        }

        public async Task<IList<string>> GetRolesAsync(User user, 
            CancellationToken cancellationToken = default)
        {
            cancellationToken.ThrowIfCancellationRequested();
            if (user == null) throw 
                new ArgumentNullException(nameof(user));

            // UserRole テーブルの UserId フィールドが user.Id と一致する
            // UserRole オブジェクトを取得。Include を使ってナビゲーション
            // プロパティ経由 Role を紐づけているので Select メソッドで
            // ロール名のリストを取得できる
            var roleNames = await db.UserRoles
                .Include(userRole => userRole.Role)
                .Where(userRole => userRole.UserId.Equals(user.Id))
                .Select(userRole => userRole.Role.Name).ToListAsync();

            // 一件も見つからない時は null ではなく中身が空(Count がゼロ)
            // の List<string> オブジェクトを返す
            return roleNames;
        }

        public async Task<bool> IsInRoleAsync(User user, string roleName, 
            CancellationToken cancellationToken = default)
        {
            cancellationToken.ThrowIfCancellationRequested();
            if (user == null) throw new ArgumentNullException(nameof(user));
            if (string.IsNullOrEmpty(roleName)) 
                throw new ArgumentException("roleName");

            // UserRole テーブルの UserId フィールドが user.Id と一致する
            // UserRole オブジェクトを取得。Include を使ってナビゲーション
            // プロパティ経由 Role を紐づけているので Select メソッドで
            // ロール名のリストを取得できる
            var roleNames = await db.UserRoles
                .Include(userRole => userRole.Role)
                .Where(userRole => userRole.UserId.Equals(user.Id))
                .Select(userRole => userRole.Role.Name).ToListAsync();

            if (roleNames != null && roleNames.Count > 0)
            {
                // 引数 roleName は大文字に変換されて渡されるので ToUpper()
                // がないと true にならない。
                bool isInRole = roleNames.Any(
                                name => name.ToUpper() == roleName);
                return isInRole;
            }

            return false;
        }

        public async Task<IList<User>> GetUsersInRoleAsync(string roleName, 
            CancellationToken cancellationToken = default)
        {
            cancellationToken.ThrowIfCancellationRequested();
            if (string.IsNullOrEmpty(roleName)) 
                throw new ArgumentException("roleName");

            // roleName に該当する Role オブジェクトを取得
            var role = await db.Roles.SingleOrDefaultAsync(
                             role => role.Name.Equals(roleName),
                             cancellationToken);

            if (role != null)
            {
                var users = await db.UserRoles
                    .Include(userRole => userRole.User)
                    .Where(userRole => userRole.RoleId.Equals(role.Id))
                    .Select(userRole => userRole.User).ToListAsync();

                // 一件も見つからない時は null ではなく中身が空の
                // List<User> オブジェクトを返すはず
                return users;
            }

            return new List<User>();
        }
    }
}

(3) ロール管理画面の実装

先の記事「ASP.NET Identity のロール管理 (CORE)」と同等な方法で、ロールの表示・追加・変更・削除およびユーザーへのロールのアサイン・解除を行う機能を実装しました。

ただし、その記事に書いた「(1) ロールサービスの追加」は不要ですので注意してください。

実装した機能を使ってロールを作成し、ユーザーをロールにアサインした結果がこの記事の一番上にある画像です。

(4) /Account/AccessDenied の実装

コントローラーやアクションメソッドに [Authorize(Roles ="アドミ")] 属性を付与すると(ロール名は日本語 OK)、「アドミ」ロールを有してないユーザーがアクセスした場合は /Account/AccessDenied にリダイレクトされます。

/Account/AccessDenied を実装してないと、リダイレクトされた際 HTTP 404 Not Found エラーとなってしまいますので実装は必要です。

リダイレクトはフレームワークが自動的に行いますので、ユーザーにアクセス権限がないことを通知するだけの簡単なページを作れば OK です。


以上で完了です。

ロールによるアクセス制限は有効に働くようになります。ユーザーの持つロールに応じて /Account/Login および /Account/AccessDenied へのリダイレクト、許可されていればページの表示が期待通り動きます。

ユーザーがアサインされているロールの削除、ロールがアサインされているユーザーの削除も、内部で階層更新が行われているのか、問題なく実行でき、結果は期待通り SQL Server の当該テーブル反映されます。

その他、同じロール名の二重登録の防止機能が組み込まれており、例えば登録済みの Xxxxx というロール名を登録しようとすると Role name 'Xxxxx' is already taken. というエラーメッセージが出て登録に失敗します。(DB にユニーク制約は付けてないのですが・・・)

上記は上位レイヤーで処理されているようです。上記以外にもパスワードのハッシュや認証クッキーの発行など上位レイヤーの機能は多々あり、それを自力で実装するのは非常に難しいので、カスタム化する範囲は Identity Store レイヤー以下でないと手に負えないと思いました。

Tags: , , , ,

CORE

ASP.NET Core Identity 独自実装(その1)

by WebSurfer 2020年9月4日 15:30

ASP.NET Core Identity によるユーザー認証に用いるデータソースとプロバイダを独自実装する話を書きます。認証機能の全てを独自実装するわけではありません(そんな実力は自分にはありません)。具体的には、下の画像(Microsoft のドキュメントより借用)にある Data Source, Data Access Layer, Identity Store を自力で実装するだけです。
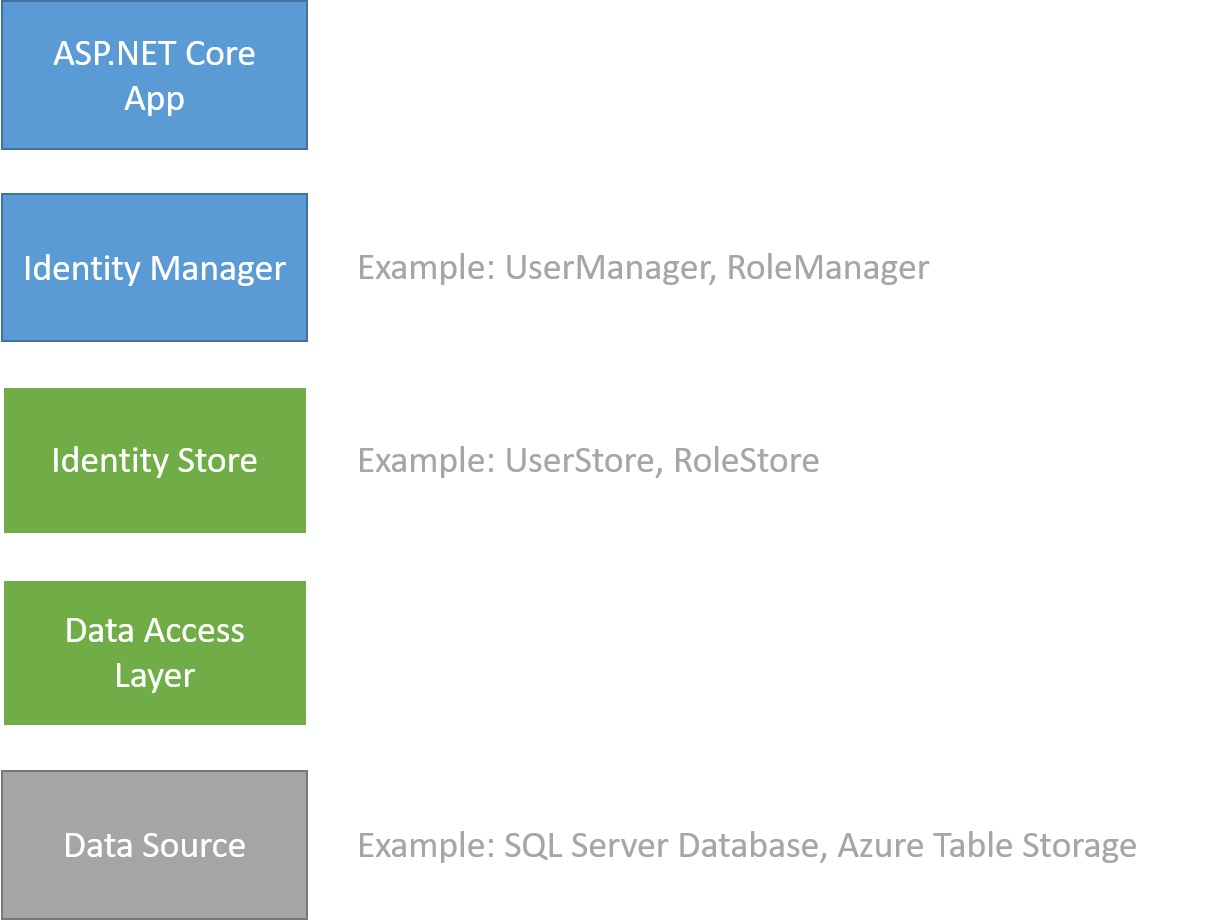
ASP.NET Identity のアーキテクチャ

この記事のタイトルが「その1」となっているのは、まずはロール機能なしでユーザー認証を実装して「その1」として書き、ロール機能の追加を「その2」で書く予定だからです。(「その2」は途中で挫折するかもしれませんが・・・)

Data Source はユーザー名とパスワードだけを保持する SQL Server とし、Data Access Layer には Entity Framework を用い、Identity Store(プロバイダ)を独自実装して、Register, Login, Logout という基本機能を ASP.NET Core 3.1 MVC アプリで使えるようにしてみました。(アカウントロックアウト、メールを使ったアカウント確認とパスワードリセット、二要素認証などの機能は実装しません)

やってみて思ったのは、既存のデータベースにユーザー情報があってそれをどうしても使わなければならないということでなければ、独自実装を行うのに必要な時間と労力に見合うメリットはなさそうということです。(Visual Studio のテンプレートで「個別のユーザーアカウント」を選んでプロジェクトを生成すれば済むはずですので)

ということで、この記事の情報はあまり役に立たないかもしれませんが、せっかく実装して動くようになったので備忘録として書いておきます。

基本的なことは Mcrosoft のドキュメント Custom storage providers for ASP.NET Core Identity が参考になると思います。それに、"To create a custom storage provider, create the data source, the data access layer, and the store classes that interact with this data access layer (上の画像の緑色と灰色の箱). You don't need to customize the managers or your app code that interacts with them (上の画像の青色の箱)." と書いてあり、それに従いました。

クラスやメソッドのコードなど具体的な実装方法は Using your own database schema and classes with ASP.NET Core Identity and Entity Framework CoreCustomize ASP.NET Core Identity を参考にさせていただきました。

それらの記事をベースに、上の画像の緑色と灰色の箱の部分を自力で実装した手順を以下に書きます。

(1) プロジェクトの作成
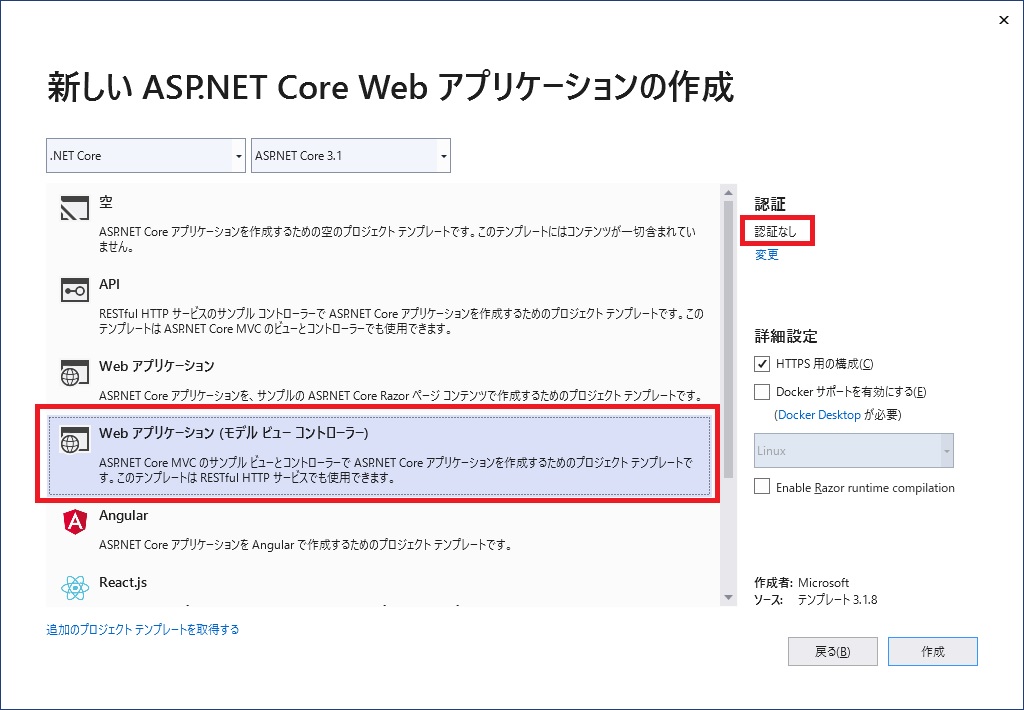
プロジェクトの作成

Visual Studio 2019 で Core 3.1 ベースの ASP.NET MVC アプリを認証なしで作成します。プロジェクト名は MvcIdCustom としました。(プロジェクト名は任意です)

(2) NuGet パッケージ
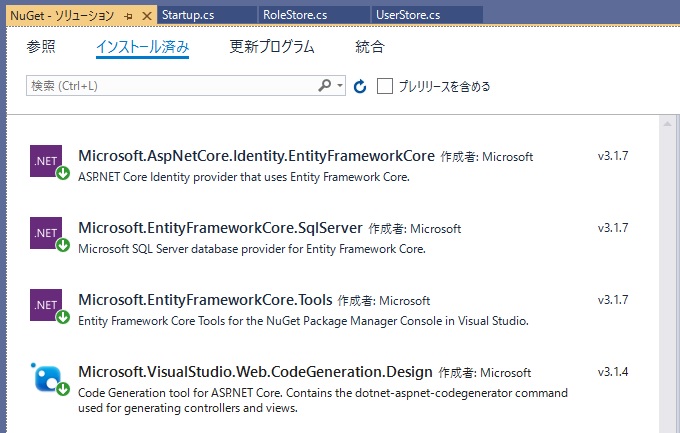
NuGet パッケージ

NuGet パッケージをインストールします。画像の上から 3 つは必須��ようです。一番下のパッケージは Visual Studio で Controller / View を生成する場合に必要なもので、ASP.NET Identity とは直接関係なさそうです。

(3) コンテキストクラスの実装

プロジェクトに DAL フォルダを新規に作ってそこにコンテキストクラス DataContext.cs を実装します。フォルダの名前やクラス名は任意ですが、これを使うコードで名前空間の指定などに影響しますので注意してください。

using MvcIdCustom.Models;
using Microsoft.EntityFrameworkCore;

namespace MvcIdCustom.DAL
{
    public class DataContext : DbContext
    {
        public DataContext(DbContextOptions<DataContext> options) : 
            base(options)
        {
        }

        public DbSet<Role> Roles { get; set; }

        public DbSet<User> Users { get; set; }

        public DbSet<UserRole> UserRoles { get; set; }
    }
}

(4) エンティティクラスの実装

既存の Models フォルダにエンティティクラス User, Role, UserRole を実装します。場所は Models フォルダでなくても良いですが、これを使うコードで名前空間の指定などに影響しますので注意してください。

using System.Collections.Generic;
using System.ComponentModel.DataAnnotations;
using System.ComponentModel.DataAnnotations.Schema;

namespace MvcIdCustom.Models
{
    [Table("User")]
    public class User
    {
        [Key, Required]
        public int Id { get; set; }

        [Required, MaxLength(128)]
        public string UserName { get; set; }

        [Required, MaxLength(1024)]
        public string PasswordHash { get; set; }

        public virtual ICollection<UserRole> UserRoles { get; set; }
    }

    [Table("Role")]
    public class Role
    {
        [Key, Required]
        public int Id { get; set; }

        [Required]
        public string Name { get; set; }

        public virtual ICollection<UserRole> UserRoles { get; set; }
    }

    [Table("UserRole")]
    public class UserRole
    {
        [Key, Required]
        public int Id { get; set; }

        [Required, ForeignKey(nameof(User))]
        public int UserId { get; set; }

        [Required, ForeignKey(nameof(Role))]
        public int RoleId { get; set; }

        public virtual Role Role { get; set; }
        public virtual User User { get; set; }
    }
}

User クラスは「個別のユーザーアカウント」を選んでプロジェクトを生成した場合に使われる IdentityUser クラスに該当します。

(5) service と接続文字列の追加

上のコンテキストクラスとエンティティクラスをベースに、Entity Framework Code First の機能を利用して SQL Server に DB を生成するのですが、その前に以下の設定をしておきます。

i) Startup.cs に service を追加

以下のコードを Startup.cs 内の ConfigureServices メソッドに追加します。接続文字列名は任意です。この記事では "Default" としています。

services.AddDbContext<DataContext>(options =>
    options.UseSqlServer(
        Configuration.GetConnectionString("Default")));

ii) 接続文字列を appsettings.json に追加

プロジェクトに appsettings.json ファイルがあるので、 それを開いて以下のように接続文字列を追加します。 カンマ等必要に応じて追加して全体的に有効な JSON 形式となるよう注意してください。

"ConnectionStrings": {
    "Default": "Server=(local)\\sqlexpress;Database=MvcIdCustom ..."
}

(6) Add-Migration, Update-Database

Visual Studio のパッケージマネージャーコンソールから Add-Migration CustomUserData コマンド(名前 CustomUserData は任意)を実行します。成功するとプロジェクトに Migrations フォルダと、その中に xxx_CustomUserData.cs ファイルが作られるはずです (xxx はコマンドの実行日時)。

その後 Update-Database を実行すれば、接続文字列に指定した名前(上の例では MvcIdCustom)で DB が生成され、その中にエンティティクラスの Table 属性に指定した名前のテーブルが生成されているはずです。

ここまでで、この記事の一番上の画像の Data Source と Data Access Layer の実装が終わったことになります。次はその上の Identity Store レイヤーの中の UserStore クラスの実装です。

(7) UserStore クラスの実装

参考にした記事をベースに、プロジェクトの DAL フォルダに、UserStore.cs として以下のように実装しました。この上のレイヤーにある UserManager, SignInManager がこのクラスに定義したメソッドを使って動くようです。

実装しましたとか簡単に書きましたが、上位レイヤーと調和を取って動くようにするにはどのように実装すべきかが全く分からず、実はこの実装が一番難問でした。パスワードのハッシュなど行われますが、何処でどう動いているのかさっぱり分かっていません。

using Microsoft.AspNetCore.Identity;
using Microsoft.EntityFrameworkCore;
using MvcIdCustom.Models;
using System;
using System.Collections.Generic;
using System.Linq;
using System.Threading;
using System.Threading.Tasks;

namespace MvcIdCustom.DAL
{
    public class UserStore : IUserStore<User>, 
                             IUserPasswordStore<User>, 
                             IQueryableUserStore<User>
    {
        private DataContext db;

        public UserStore(DataContext db)
        {
            this.db = db;
        }

        public void Dispose()
        {
            Dispose(true);
        }

        protected virtual void Dispose(bool disposing)
        {
            if (disposing)
            {
                if (db != null)
                {
                    db.Dispose();
                    db = null;
                }                
            }
        }

        // IQueryableUserStore<User> のメンバー
        public IQueryable<User> Users
        {
            get { return db.Users.Select(u => u); }
        }

        // IUserStore<TUser>
        public Task<string> GetUserIdAsync(User user, 
            CancellationToken cancellationToken = default)
        {
            cancellationToken.ThrowIfCancellationRequested();
            if (user == null) throw new ArgumentNullException(nameof(user));

            return Task.FromResult(user.Id.ToString());
        }

        // IUserStore<TUser>
        public Task<string> GetUserNameAsync(User user, 
            CancellationToken cancellationToken = default)
        {
            cancellationToken.ThrowIfCancellationRequested();
            if (user == null) throw new ArgumentNullException(nameof(user));

            return Task.FromResult(user.UserName);
        }

        // IUserStore<TUser>
        public Task SetUserNameAsync(User user, 
            string userName, 
            CancellationToken cancellationToken = default)
        {
            cancellationToken.ThrowIfCancellationRequested();
            if (user == null) throw new ArgumentNullException(nameof(user));
            if (string.IsNullOrEmpty(userName)) 
                throw new ArgumentException("userName");

            user.UserName = userName;

            return Task.CompletedTask;
        }

        // IUserStore<TUser>
        public Task<string> GetNormalizedUserNameAsync(User user, 
            CancellationToken cancellationToken = default)
        {
            cancellationToken.ThrowIfCancellationRequested();
            if (user == null) throw new ArgumentNullException(nameof(user));

            return Task.FromResult(user.UserName);
        }

        // IUserStore<TUser>
        public Task SetNormalizedUserNameAsync(User user, 
            string normalizedName, 
            CancellationToken cancellationToken = default)
        {
            cancellationToken.ThrowIfCancellationRequested();
            if (user == null) throw new ArgumentNullException(nameof(user));
            if (string.IsNullOrEmpty(normalizedName)) 
                throw new ArgumentException("normalizedName");

            return Task.CompletedTask;
        }

        // IUserStore<TUser>
        // 同じユーザー名の二重登録の防止機能は上位レイヤーに組み込まれている
        public async Task<IdentityResult> CreateAsync(User user, 
            CancellationToken cancellationToken = default)
        {
            cancellationToken.ThrowIfCancellationRequested();
            if (user == null) throw new ArgumentNullException(nameof(user));

            db.Add(user);

            int rows = await db.SaveChangesAsync(cancellationToken);

            if (rows > 0)
            { 
                return IdentityResult.Success;
            }

            return IdentityResult.Failed(
                new IdentityError { Description = $"{user.UserName} 登録失敗" });
        }

        // IUserStore<TUser>
        // 同じユーザー名の二重登録の防止機能は上位レイヤーに組み込まれている
        public async Task<IdentityResult> UpdateAsync(User user, 
            CancellationToken cancellationToken = default)
        {
            cancellationToken.ThrowIfCancellationRequested();
            if (user == null) throw new ArgumentNullException(nameof(user));

            db.Update(user);

            int rows = await db.SaveChangesAsync(cancellationToken);

            if (rows > 0)
            {
                return IdentityResult.Success;
            }

            return IdentityResult.Failed(
                new IdentityError { Description = $"{user.UserName} 更新失敗" });
        }

        // IUserStore<TUser>
        public async Task<IdentityResult> DeleteAsync(User user, 
            CancellationToken cancellationToken = default)
        {
            cancellationToken.ThrowIfCancellationRequested();
            if (user == null) throw new ArgumentNullException(nameof(user));

            db.Remove(user);

            int rows = await db.SaveChangesAsync(cancellationToken);

            if (rows > 0)
            {
                return IdentityResult.Success;
            }

            return IdentityResult.Failed(
                new IdentityError { Description = $"{user.UserName} 削除失敗" });
        }

        // IUserStore<TUser>
        public async Task<User> FindByIdAsync(string userId, 
            CancellationToken cancellationToken = default)
        {
            cancellationToken.ThrowIfCancellationRequested();

            if (int.TryParse(userId, out int id))
            {
                return await db.Users.SingleOrDefaultAsync(u => u.Id == id, 
                    cancellationToken);
            }
            else
            {
                return await Task.FromResult<User>(null);
            }
        }

        // IUserStore<TUser>
        public async Task<User> FindByNameAsync(string normalizedUserName, 
            CancellationToken cancellationToken = default)
        {
            cancellationToken.ThrowIfCancellationRequested();
            if (string.IsNullOrEmpty(normalizedUserName))
                throw new ArgumentException("normalizedUserName");

            User user = await db.Users.SingleOrDefaultAsync(
                u => u.UserName.Equals(normalizedUserName.ToLower()), 
                cancellationToken);

            return user;
        }

        // IUserPasswordStore<TUser>
        public Task SetPasswordHashAsync(User user, 
            string passwordHash, 
            CancellationToken cancellationToken = default)
        {
            cancellationToken.ThrowIfCancellationRequested();
            if (user == null) throw new ArgumentNullException(nameof(user));
            if (string.IsNullOrEmpty(passwordHash))
                throw new ArgumentException("passwordHash");

            user.PasswordHash = passwordHash;

            return Task.CompletedTask;
        }

        // IUserPasswordStore<TUser>
        public Task<string> GetPasswordHashAsync(User user, 
            CancellationToken cancellationToken = default)
        {
            cancellationToken.ThrowIfCancellationRequested();
            if (user == null) throw new ArgumentNullException(nameof(user));

            return Task.FromResult(user.PasswordHash);
        }

        // IUserPasswordStore<TUser>
        public Task<bool> HasPasswordAsync(User user, 
            CancellationToken cancellationToken = default)
        {
            cancellationToken.ThrowIfCancellationRequested();
            if (user == null) throw new ArgumentNullException(nameof(user));

            return Task.FromResult(
                !string.IsNullOrWhiteSpace(user.PasswordHash));
        }
    }
}

ロール機能を使えるようにするには IUserRoleStore<User> を継承し、AddToRoleAsync, GetRolesAsync, IsInRoleAsync, RemoveFromRoleAsync メソッドを実装する必要があるかもしれませんが、それは「その2」で考えることにします。

(8) RoleStore クラスの実装

この記事「その1」ではロール機能は実装しないので必要ないのですが、「その2」で実装する予定ですので骨組みだけ作っておくことにしました。

using System;
using System.Linq;
using System.Threading;
using System.Threading.Tasks;
using Microsoft.AspNetCore.Identity;
using Microsoft.EntityFrameworkCore;
using MvcIdCustom.Models;

namespace MvcIdCustom.DAL
{
    public class RoleStore : IRoleStore<Role>, IQueryableRoleStore<Role>
    {
        public IQueryable<Role> Roles => throw new NotImplementedException();

        public Task<IdentityResult> CreateAsync(Role role, CancellationToken cancellationToken)
        {
            throw new NotImplementedException();
        }

        public Task<IdentityResult> DeleteAsync(Role role, CancellationToken cancellationToken)
        {
            throw new NotImplementedException();
        }

        public void Dispose()
        {
            //throw new NotImplementedException();
        }

        public Task<Role> FindByIdAsync(string roleId, CancellationToken cancellationToken)
        {
            throw new NotImplementedException();
        }

        public Task<Role> FindByNameAsync(string normalizedRoleName, CancellationToken cancellationToken)
        {
            throw new NotImplementedException();
        }

        public Task<string> GetNormalizedRoleNameAsync(Role role, CancellationToken cancellationToken)
        {
            throw new NotImplementedException();
        }

        public Task<string> GetRoleIdAsync(Role role, CancellationToken cancellationToken)
        {
            throw new NotImplementedException();
        }

        public Task<string> GetRoleNameAsync(Role role, CancellationToken cancellationToken)
        {
            throw new NotImplementedException();
        }

        public Task SetNormalizedRoleNameAsync(Role role, string normalizedName, CancellationToken cancellationToken)
        {
            throw new NotImplementedException();
        }

        public Task SetRoleNameAsync(Role role, string roleName, CancellationToken cancellationToken)
        {
            throw new NotImplementedException();
        }

        public Task<IdentityResult> UpdateAsync(Role role, CancellationToken cancellationToken)
        {
            throw new NotImplementedException();
        }
    }
}

上の RoleStore クラスの中身は Visual Studio で自動生成できます。Dispose メソッドの throw new NotImplementedException(); をコメントアウトしておかないとエラーになるので注意してください。

(9) Startup.cs への追加

以下のコードを Startup.cs 内の ConfigureServices メソッドに追加します。

// Tell identity to use custom classes for users and roles
services.AddIdentity<User, Role>()
    .AddDefaultTokenProviders();

// Tell identity to use custom storage provider for users
services.AddTransient<IUserStore<User>, UserStore>();

// Tell identity to use custom storage provider for roles
services.AddTransient<IRoleStore<Role>, RoleStore>();

さらに、認証ミドルウェアを使うために app.UseAuthorization(); を Configure メソッドに追加します。順番があるので注意してください。以下の場所に追加します。

public void Configure(IApplicationBuilder app, IWebHostEnvironment env)
{
    // ・・・中略・・・

    app.UseHttpsRedirection();
    app.UseStaticFiles();
    app.UseRouting();

    // 以下の一行を追加
    app.UseAuthentication();
            
    app.UseAuthorization();

    app.UseEndpoints(endpoints =>
    {
        endpoints.MapControllerRoute(
            name: "default",
            pattern: "{controller=Home}/{action=Index}/{id?}");
    });
}

以上でこの記事の一番上の画像の Data Source, Data Access Layer, Identity Store レイヤーの実装は完了です。ここまでの実装で、先の記事「ASP.NET Identity のユーザー管理 (CORE)」と同じ手段でユーザー情報の表示、追加、変更、削除が可能になることは確認しました。

次は Register, Login, Logout 機能の実装ですが、それを続けてここに書くと一つの記事としては長くなりすぎるので、別の記事「Register, Login, Logout 機能の実装」に書きました。


「その2」も書きました。こちらの記事「ASP.NET Core Identity 独自実装(その2)」です。

Tags: , , , ,

CORE

ASP.NET Identity のロール管理 (CORE)

by WebSurfer 2020年6月1日 10:07

ASP.NET Core Identity のユーザー認証を実装した ASP.NET Core 3.1 MVC アプリに、管理者がロールの表示・追加・変更・削除およびユーザーへのロールのアサイン・解除を行う機能を実装してみます。

ロール情報の表示

先の記事「ASP.NET Identity のロール管理 (MVC)」で .NET Framework 版を書きましたが、この記事は Core 3.1 版です。

ベースとしているアプリは、先の記事「ASP.NET Identity のユーザー管理 (CORE)」で、管理者用のユーザー管理ページを実装したものです。

(1) ロールサービスの追加

ロールを使うにはサービスの追加が必要になります。以下のように、既存のコードに .AddRoles<IdentityRole>() を一行追加するだけで OK です。.NET Framework 版のアプリとは違って Migration 操作は不要です。

ロールサービスの追加

この記事のベースとしているアプリは「認証なし」で作成したあとスキャフォールディングで ASP.NET Core Identity を実装していますので、既存のコードは Areas/Identity フォルダの IdentityHostingStartup.cs ファイルにあります。上の画像がそれです。

認証を「個別のユーザーアカウント」としてプロジェクトを作成すると、サービス関係のコードは上の画像とは異なり、アプリケーションルート直下の Startup.cs フォルダに配置されます。

これだけでロールは使えるようになりますが、ロールの作成・変更・削除や、登録済みユーザーへのロールのアサイン・解除を行う機能は自力でコード書いて実装しなければなりません。その基本的な方法を以下に書きます。

(2) Model の作成

プロジェクトのルート直下の Models フォルダに RoleModel.cs というクラスファイルを追加し、その中に RoleModel クラスを定義して使います。(ファイル名、モデル名は任意です)

using System.Collections.Generic;
using System.ComponentModel.DataAnnotations;

namespace MySQLIdentity.Models
{
    // ロールの表示、追加、変更、削除用の Model
    // Index, Details, Create, Edit に使用
    public class RoleModel
    {
        public string Id { get; set; }

        [Required(ErrorMessage = "{0}は必須です。")]
        [StringLength(
          100,
          ErrorMessage = "{0} は {2} 文字以上",
          MinimumLength = 3)]
        [Display(Name = "ロール名")]
        public string Name { get; set; }
    }

    // 各ユーザーへのロールのアサイン状況一覧表示と
    // ロールのアサイン・解除用の Model
    // UserWithRoles, EditRoleAssignment に使用
    public class UserWithRoleInfo
    {
        public UserWithRoleInfo()
        {
            UserRoles = new List<RoleInfo>();
        }

        public string UserId { set; get; }

        [Display(Name = "ユーザー名")]
        public string UserName { set; get; }
        public string UserEmail { set; get; }

        public IList<RoleInfo> UserRoles { set; get; }
    }

    public class RoleInfo
    {
        public string RoleName { set; get; }
        public bool IsInThisRole { set; get; }
    }
}

RoleModel クラスはアクションメソッド Index, Details, Create, Edit でロールの表示、追加、変更、削除を行うために用いられる Model です。

フレームワークのライブラリに定義済みの IdentityRole クラスを利用することも可能です。

しかし、IdentityRole クラスを使うと (a) スキャフォールディング機能を使って View を生成できない(デザイナの「Razor ビューの追加」のダイアログで[モデルクラス(M):]の一覧に IdentityRole が現れない)、(b) 表示名を自由に付けられない・・・という理由で RoleModel クラスを定義して使うことにしました。

RoleModel クラスを使うと、Controller で Linq To Entities を使って取得した IdentityRole オブジェクトを RoleModel クラスに詰め替えなければならないという手間が増えますがやむを得ません。

UserWithRoleInfo, RoleInfo クラスは、アクションメソッド UserWithRoles, EditRoleAssignment で、ユーザーへのロールのアサイン状況の表示(この記事の一番上の画像参照)およびユーザーへのロールのアサイン・解除を行うために用いられる Model です。

(3) Controller の作成

.NET Framework 版の ASP.NET MVC5 アプリと違って、Core 版には組み込みの DI 機能があります。今回のケースではコントローラーを初期化する際に UserManager<MySQLIdentityUser> と RoleManager<IdentityRole> オブジェクトが注入されるよう実装します。

ロールの表示・追加・変更・削除を行うためコントローラーのコードは以下の通りです(この記事では Details アクションメソッドは実装していませんが、別の記事にロールに属するユーザー一覧を表示する機能を Details として実装してみましたので、興味があればそちらも見てください)。細かい注意点はコメントで入れましたのでそれを見てください。

using System.Collections.Generic;
using System.Linq;
using System.Threading.Tasks;
using Microsoft.AspNetCore.Mvc;
// 追加
using Microsoft.AspNetCore.Identity;
using MySQLIdentity.Areas.Identity.Data;
using Microsoft.EntityFrameworkCore;
using MySQLIdentity.Models;


namespace MySQLIdentity.Controllers
{
    public class RoleController : Controller
    {
        // コントローラーを呼び出すと DI により自動的にコンストラクタに
        // UserManager<MySQLIdentityUser> と RoleManager<IdentityRole>
        // オブジェクトへの参照が渡される
        private readonly UserManager<MySQLIdentityUser> _userManager;
        private readonly RoleManager<IdentityRole> _roleManager;

        public RoleController(UserManager<MySQLIdentityUser> userManager,
                              RoleManager<IdentityRole> roleManager)
        {
            _userManager = userManager;
            _roleManager = roleManager;
        }

        // GET: Role/Index
        // Model は RoleModel
        public async Task<IActionResult> Index()
        {
            var roles = from r in _roleManager.Roles
                        orderby r.Name
                        select new RoleModel
                        {
                            Id = r.Id,
                            Name = r.Name
                        };

            return View(await roles.ToListAsync());
        }


        // GET: Role/Details/5・・・省略
        // ロール名以外の情報は含まれないので不要


        // GET: Role/Create
        // Model は RoleModel クラス
        public IActionResult Create()
        {
            return View();
        }

        // POST: Role/Create
        [HttpPost]
        [ValidateAntiForgeryToken]
        public async Task<IActionResult> Create(
                            [Bind("Id,Name")] RoleModel model)
        {
            if (ModelState.IsValid)
            {
                // ユーザーが入力したロール名を model.Name から
                // 取得し IdentityRole オブジェクトを生成
                var role = new IdentityRole { Name = model.Name };

                // 上の IdentityRole から新規ロールを作成・登録
                var result = await _roleManager.CreateAsync(role);

                if (result.Succeeded)
                {
                    // 登録に成功したら Role/Index にリダイレクト
                    return RedirectToAction("Index", "Role");
                }

                // result.Succeeded が false の場合 ModelSate にエ
                // ラー情報を追加しないとエラーメッセージが出ない。
                // Register.cshtml.cs のものをコピー
                foreach (var error in result.Errors)
                {
                    ModelState.AddModelError(string.Empty, 
                                             error.Description);
                }
            }

            // ロールの登録に失敗した場合、登録画面を再描画
            return View(model);
        }

        // GET: Role/Edit/5
        // Edit でできるのはロール名の変更のみ
        // Model は RoleModel クラス
        public async Task<IActionResult> Edit(string id)
        {
            if (id == null)
            {
                return NotFound();
            }

            var target = await _roleManager.FindByIdAsync(id);

            if (target == null)
            {
                return NotFound();
            }

            RoleModel model = new RoleModel
            { 
                Name = target.Name 
            };

            return View(model);
        }

        // POST: Role/Edit/5
        [HttpPost]
        [ValidateAntiForgeryToken]
        public async Task<IActionResult> Edit(string id, 
                        [Bind("Id,Name")] RoleModel model)
        {
            if (id == null)
            {
                return NotFound();
            }

            if (ModelState.IsValid)
            {
                var target = await _roleManager.FindByIdAsync(id);
                if (target == null)
                {
                    return NotFound();
                }

                // ユーザーが入力したロール名を model.Name から取得し
                // て IdentityRole の Name を書き換え
                target.Name = model.Name;

                // Name を書き���えた IdentityRole で更新をかける
                var result = await _roleManager.UpdateAsync(target);

                if (result.Succeeded)
                {
                    // 更新に成功したら Role/Index にリダイレクト
                    return RedirectToAction("Index", "Role");
                }

                // result.Succeeded が false の場合 ModelSate にエ
                // ラー情報を追加しないとエラーメッセージが出ない。
                // Register.cshtml.cs のものをコピー
                foreach (var error in result.Errors)
                {
                    ModelState.AddModelError(string.Empty, 
                                             error.Description);
                }
            }

            // 更新に失敗した場合、編集画面を再描画
            return View(model);
        }

        // GET: Role/Delete/5
        // 階層更新が行われているようで、ユーザーがアサインされて
        // いるロールも削除可能。
        // Model は RoleModel
        public async Task<IActionResult> Delete(string id)
        {
            if (id == null)
            {
                return NotFound();
            }

            var role = await _roleManager.FindByIdAsync(id);

            if (role == null)
            {
                return NotFound();
            }

            var model = new RoleModel
            {
                Id = role.Id,
                Name = role.Name
            };

            return View(model);
        }

        // POST: Role/Delete/5
        // 上の Delete(string id) と同シグネチャのメソッド
        // は定義できないので、メソッド名を変えて、下のよう
        // に ActionName("Delete") を設定する
        [HttpPost, ActionName("Delete")]
        [ValidateAntiForgeryToken]
        public async Task<IActionResult> DeleteConfirmed(string id)
        {
            if (id == null)
            {
                return NotFound();
            }

            var role = await _roleManager.FindByIdAsync(id);

            if (role == null)
            {
                return NotFound();
            }

            // ユーザーがアサインされているロールも以下の一行で
            // 削除可能。内部で階層更新が行われているらしい。
            var result = await _roleManager.DeleteAsync(role);

            if (result.Succeeded)
            {
                // 削除に成功したら Role/Index にリダイレクト
                return RedirectToAction("Index", "Role");
            }

            // result.Succeeded が false の場合 ModelSate にエ
            // ラー情報を追加しないとエラーメッセージが出ない。
            // Register.cshtml.cs のものをコピー
            foreach (var error in result.Errors)
            {
                ModelState.AddModelError(string.Empty, 
                                         error.Description);
            }
            // 削除に失敗した場合、削除画面を再描画
            var model = new RoleModel
            {
                Id = role.Id,
                Name = role.Name
            };

            return View(model);
        }
    }
}

登録済みユーザーへのロールのアサイン状況の表示、個々のユーザーへのロールの追加・削除を行うためのアクションメソッドは以下の通りです。実際は、上のコードの RoleController 内に実装しています(分けたのは単にその方が読みやすいと思ったからです)。

// 以下は:
// (1) UserWithRoles で登録済みユーザーの一覧と各ユーザーへの
//     ロールのアサイン状況を表示し、
// (2) Edit ボタンクリックで EditRoleAssignment に遷移し、当該
//     ユーザーへのロールのアサインを編集して保存
// ・・・を行うアクションメソッド。

// GET: Role/UserWithRoles
// ユーザー一覧と各ユーザーにアサインされているロールを表示
// Model は UserWithRoleInfo クラス
public async Task<IActionResult> UserWithRoles()
{
    var model = new List<UserWithRoleInfo>();

    // ToListAsync() を付与してここで DB からデータを取得して
    // DataReader を閉じておかないと、下の IsInRole メソッド
    // でエラーになるので注意
    var users = await _userManager.Users.
                OrderBy(user => user.UserName).ToListAsync();
    var roles = await _roleManager.Roles.
                OrderBy(role => role.Name).ToListAsync();

    foreach (MySQLIdentityUser user in users)
    {
        var info = new UserWithRoleInfo
        {
            UserId = user.Id,
            UserName = user.UserName,
            UserEmail = user.Email
        };

        foreach (IdentityRole role in roles)
        {
            RoleInfo roleInfo = new RoleInfo();
            roleInfo.RoleName = role.Name;
            roleInfo.IsInThisRole = await _userManager.
                                    IsInRoleAsync(user, role.Name);
            info.UserRoles.Add(roleInfo);
        }
        model.Add(info);
    }

    return View(model);
}

// GET: Role/EditRoleAssignment/Id
// 指定 Id のユーザーのロールへのアサインの編集
// Model は UserWithRoleInfo クラス
public async Task<IActionResult> EditRoleAssignment(string id)
{
    if (id == null)
    {
        return NotFound();
    }

    var user = await _userManager.FindByIdAsync(id);
    if (user == null)
    {
        return NotFound();
    }

    var model = new UserWithRoleInfo
    {
        UserId = user.Id,
        UserName = user.UserName,
        UserEmail = user.Email
    };

    // ToListAsync() を付与しておかないと下の IsInRole メソッド
    // で DataReader が閉じてないというエラーになる
    var roles = await _roleManager.Roles.
                  OrderBy(role => role.Name).ToListAsync();

    foreach (IdentityRole role in roles)
    {
        RoleInfo roleInfo = new RoleInfo();
        roleInfo.RoleName = role.Name;
        roleInfo.IsInThisRole = await _userManager.
                                IsInRoleAsync(user, role.Name);
        model.UserRoles.Add(roleInfo);
    }

    return View(model);
}

// POST: Role/EditRoleAssignment/Id
[HttpPost]
[ValidateAntiForgeryToken]
public async Task<IActionResult> EditRoleAssignment(string id, 
  [Bind("UserId,UserName,UserEmail,UserRoles")] UserWithRoleInfo model)
{
    if (id == null)
    {
        return NotFound();
    }

    // IsInRoleAsync, AddToRoleAsync, RemoveFromRoleAsync メソッド
    // の引数が MVC5 とは異なり、id ではなく MySQLIdentityUser が
    // 必要なのでここで取得しておく
    var user = await _userManager.FindByIdAsync(id);
    if (user == null)
    {
        return NotFound();
    }

    if (ModelState.IsValid)
    {
        IdentityResult result;

        foreach (RoleInfo roleInfo in model.UserRoles)
        {
            // id のユーザーが roleInfo.RoleName のロールに属して
            // いるか否か。以下でその情報が必要。
            bool isInRole = await _userManager.
                            IsInRoleAsync(user, roleInfo.RoleName);

            // roleInfo.IsInThisRole には編集画面でロールのチェッ
            // クボックスのチェック結果が格納されている
            if (roleInfo.IsInThisRole)
            {
                // チェックが入っていた場合

                // 既にロールにアサイン済みのユーザーを AddToRole
                // するとエラーになるので以下の判定が必要
                if (isInRole == false)
                {
                    result = await _userManager.AddToRoleAsync(user, 
                                                      roleInfo.RoleName);
                    if (!result.Succeeded)
                    {
                        // result.Succeeded が false の場合 ModelSate にエ
                        // ラー情報を追加しないとエラーメッセージが出ない。
                        // Register.cshtml.cs のものをコピー
                        foreach (var error in result.Errors)
                        {
                            ModelState.AddModelError(string.Empty, 
                                                     error.Description);
                        }
                        return View(model);
                    }
                }
            }
            else
            {
                // チェックが入っていなかった場合

                // ロールにアサインされてないユーザーを
                // RemoveFromRole するとエラーになるので以下の
                // 判定が必要
                if (isInRole == true)
                {
                    result = await _userManager.
                             RemoveFromRoleAsync(user, roleInfo.RoleName);
                    if (!result.Succeeded)
                    {
                        foreach (var error in result.Errors)
                        {
                            ModelState.AddModelError(string.Empty, 
                                                     error.Description);
                        }
                        return View(model);
                    }
                }
            }
        }

        // 編集に成功したら Role/UserWithRoles にリダイレクト
        return RedirectToAction("UserWithRoles", "Role");
    }

    // 編集に失敗した場合、編集画面を再描画
    return View(model);
}

(4) View の作成

View は Controller のアクションメソッドを右クリックして[ビューの追加(D)...]からスキャフォールディング機能を使って生成します。

Razor ビューの追加

アクションメソッド EditRoleAssignment に対応する View は自動生成されるコードだけでは不十分でいろいろ追加・修正が必要です。以下にその完成版のコードを載せておきます。

@model MySQLIdentity.Models.UserWithRoleInfo

@{
    ViewData["Title"] = "EditRoleAssignment";
    Layout = "~/Views/Shared/_Layout.cshtml";
}

<h1>EditRoleAssignment</h1>

<h4>UserWithRoleInfo</h4>
<hr />
<form asp-action="EditRoleAssignment">
    <table class="table">
        <thead>
            <tr>
                <th>
                    @Html.DisplayNameFor(model => model.UserName)
                </th>
                @foreach (var role in Model.UserRoles)
                {
                    <th>
                        @Html.DisplayFor(modelItem => role.RoleName)
                    </th>
                }
            </tr>
        </thead>
        <tbody>
            <tr>
                <td>
                    @Html.DisplayFor(model => model.UserName)
                    @Html.HiddenFor(model => model.UserName)
                    @Html.HiddenFor(model => model.UserEmail)
                    @Html.HiddenFor(model => model.UserId)
                </td>
                @for (int i = 0; i < Model.UserRoles.Count; i++)
                {
                    <td>
                        @Html.EditorFor(model => model.UserRoles[i].IsInThisRole)
                        @Html.HiddenFor(model => model.UserRoles[i].RoleName)
                    </td>
                }

            </tr>
        </tbody>
    </table>
    <div class="form-group">
        <input type="submit" value="Save" class="btn btn-primary" />
    </div>
</form>

<div>
    <a asp-action="UserWithRoles">Back to List</a>
</div>

@section Scripts {
    @{await Html.RenderPartialAsync("_ValidationScriptsPartial");}
}

上の View のコードで注意すべき点は、コレクション(上の例では Model.UserRoles で取得できる RoleInfo クラスのコレクション) についてはレンダリングされる html 要素の name 属性が連番のインデックスを含むようにすることです。具体的には、name="prefix[index].Property" というパターンにします。

そうしないとモデルバインディングがうまくいきません。 その理由など詳しくは先の記事「コレクションのデータアノテーション検証」を見てください。

Tags: , , ,

CORE

About this blog

2010年5月にこのブログを立ち上げました。主に ASP.NET Web アプリ関係の記事です。

Calendar

<<  2024年4月  >>
31123456
78910111213
14151617181920
21222324252627
2829301234
567891011

View posts in large calendar