WebSurfer's Home

トップ > Blog 1   |   ログイン
APMLフィルター

GridView のヘッダ、列を固定(その 2)

by WebSurfer 2013年2月4日 21:26

github というサイトの Grid というページに紹介されている JavaScript(jQuery ではない)と CSS を利用して、GridView のヘッダと列を固定する例の紹介です。
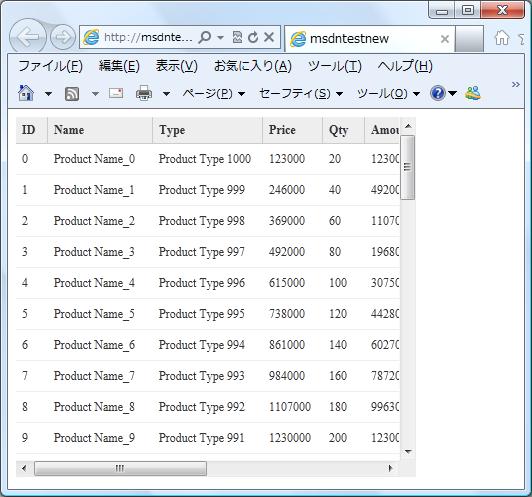
GridView に Grid.js, Grid.css を適用

先の記事「GridView のヘッダ、列を固定」で、CSS の Internet Explorer (IE) 独自実装である expression 関数を使ってテーブルのヘッダと列を固定する例を書きました。

しかしながら、expression 関数のサポートは終了していて IE でも互換モードでないと動きませんし、IE の独自実装なので、当然、Firefox など他のブラウザでは動きませんので、あまり使い道はありません。

2017/8/16 注記追加
Windows 10 IE11 では Quirks モード(IE5 相当)にしても expression 関数が働かないようです。いつそうなったのかは不明ですが、expression 関数を使ってテーブルのヘッダ・列を固定する方法は使用禁止にした方がよさそうです。

代わりに、上に紹介した Grid のページから入手できる Grid.js と Grid.css を利用して、GridView のヘッダと列を固定するサンプルを作ってみました。これなら IE7+, Firefox, Chrome, Safari, Opera コンパチなので一般的に使えると思います。

上の画像を表示したサンプルコードを以下に書いておきます。注意点は以下およびコード内のコメントに書いておきましたので読んでください。

  1. Grid.js は、table の DOM、json 文字列、xml 文字列のいずれかをソースとして、ヘッダや列を固定可能なテーブルを生成します。GridView の場合は、GridView が生成した table の DOM をソースとして使うことになります。
  2. GridView が生成した table の DOM は、Grid.js が生成した別テーブルに置き換えられます。つまり、上の画像に表示されているテーブルは GridView ではなく、Grid.js が生成した別物です。
  3. Grid.js が生成した別テーブルを操作してデータベースの更新を行うのは無理っぽいです。別テーブルは表示するだけにして、更新は別に DetailsView か FormView を表示して行うのがよさそうです。

実際に動かして試すことができるよう 実験室 にアップしました。興味のある方は試してみてください。

<%@ Page Language="C#" %>
<%@ Import Namespace="System.Data" %>

<!DOCTYPE html PUBLIC "-//W3C//DTD XHTML 1.0 Transitional//EN"
 "http://www.w3.org/TR/xhtml1/DTD/xhtml1-transitional.dtd">

<script runat="server">
  // データソース用の DataTable を作成
  protected DataTable CreateDataTable()
  {
    DataTable dt = new DataTable();
    DataRow dr;

    dt.Columns.Add(new DataColumn("ID", typeof(Int32)));
    dt.Columns.Add(new DataColumn("Name", typeof(string)));
    dt.Columns.Add(new DataColumn("Type", typeof(string)));
    dt.Columns.Add(new DataColumn("Price", typeof(Int32)));
    dt.Columns.Add(new DataColumn("Qty", typeof(Int32)));
    dt.Columns.Add(new DataColumn("Amount", typeof(Int32)));
    dt.Columns.Add(new DataColumn("CategoryID", typeof(Int32)));
    dt.Columns.Add(new DataColumn("Note", typeof(string)));
    dt.Columns.Add(new DataColumn("Discontinued", typeof(bool)));
    dt.Columns.Add(new DataColumn("DateTime", typeof(DateTime)));

    for (int i = 0; i < 50; i++)
    {
      dr = dt.NewRow();
      dr["ID"] = i;
      dr["Name"] = "Product Name_" + i.ToString();
      dr["Type"] = "Product Type " + (100 - i).ToString();
      dr["Price"] = 123000 * (i + 1);
      dr["Qty"] = (i + 1) * 20;
      dr["Amount"] = 123000 * (i + 1) * (i + 1);
      dr["CategoryID"] = 100 - i;
      dr["Note"] = "Note_" + i.ToString();
      dr["Discontinued"] = (i%2 == 0)? true : false;
      dr["DateTime"] = DateTime.Now.AddDays(i);
      dt.Rows.Add(dr);
    }
    return dt;
  }

  // GridView に上記メソッドで作った DataTable をバインド
  protected void Page_Load(object sender, EventArgs e)
  {
    if (!IsPostBack)
    {
      GridView1.DataSource = CreateDataTable();
      GridView1.DataBind();
    }
  }

  // ソースが DOM の場合、thead, tbody が必要。
  // GridView はデフォルトでは thead, tbody は生成
  // されないので、以下のコードを使って追加する。
  protected void GridView1_RowCreated(
    object sender, GridViewRowEventArgs e)
  {
    if (e.Row.RowType == DataControlRowType.Header)
    {
      e.Row.TableSection =
        System.Web.UI.WebControls.TableRowSection.TableHeader;
    }
    else if (e.Row.RowType == DataControlRowType.DataRow)
    {
      e.Row.TableSection =
        System.Web.UI.WebControls.TableRowSection.TableBody;
    }
    // フッターがある場合(GridView.ShowFooter が true の場合)は
    // 以下のコードのコメントアウトを解除。
    //else if (e.Row.RowType == DataControlRowType.Footer)
    //{
    //  e.Row.TableSection =
    //    System.Web.UI.WebControls.TableRowSection.TableFooter;
    //}
  }
</script>

<html xmlns="http://www.w3.org/1999/xhtml">
<head runat="server">
  <title></title>
  <script src="/Scripts/Grid.js" type="text/javascript"></script>
  <link href="/css/Grid.css" rel="stylesheet" type="text/css" />
  <script type="text/javascript">
  //<![CDATA[
    window.onload = function () {
      // GridView は div 要素で囲った table を生成するの
      // で、その div 要素を利用する。div 要素に id を付
      // 与して初期サイズを指定する CSS を設定する。
      // div 要素の直下に table がないと、Grid.js による
      // 置き換えがうまくいかない(GridView の table が
      // 残ってしまう)ので注意。
      var tableGridView = 
        document.getElementById("<%=GridView1.ClientID%>");
      var parentElement = tableGridView.parentNode;
      parentElement.setAttribute("id", "myGrid");
      parentElement.setAttribute("class", "style1");

      // ソートするために各列のデータ型を指定。デフォルト
      // は string なので、数字などの列がある場合は指定し
      // ないとソート結果が期待通りにならない。
      var gridColSortTypes =
        ["number", "string", "string", "number", "number", 
        "number", "number", "string", "none", "date"];

      // GridView (table) の場合、srcType は "dom" に設定。
      // 下のコードの myGrid は table を囲う div 要素の id。
      // SrcData には table の id(GridView の ClientID)を
      // 設定。その他のパラメータ設定は Grid のページ参照。
      // Grid.js は、SrcData に指定された table の DOM を
      // ソースに使って別テーブルを生成し、元の table と置
      // き換える。
      new Grid("myGrid", {
        srcType: "dom",
        srcData: "<%=GridView1.ClientID%>",
        allowGridResize: true,
        allowColumnResize: true,
        allowClientSideSorting: true,
        allowSelections: true,
        allowMultipleSelections: true,
        showSelectionColumn: false,
        colSortTypes : gridColSortTypes,
        fixedCols: 1
      });
    };
  //]]>
  </script>

  <style type="text/css">
    /* テーブルの初期サイズの指定 */
    .style1
    {
      width: 400px;
      height: 360px;
    }    
  </style>
</head>
<body>
  <form id="form1" runat="server">
  <asp:GridView ID="GridView1" 
    runat="server"
    OnRowCreated="GridView1_RowCreated" 
    EnableViewState="False">
  </asp:GridView>
  </form>
</body>
</html>

Tags: ,

JavaScript

ModalPopup を別ページから非表示

by WebSurfer 2013年1月27日 16:52

Ajax Control Toolkit の ModalPopup 内の iframe に別ページを表示し、その別ページに配置されているボタンをクリックして ModalPopup を非表示にする方法の紹介です。

ModalPopup はクライアントスクリプトで非表示にできます。それには、Modalpopup をページに配置するとダウンロードされるクライアントスクリプトに定義されている hide メソッドを使います。

従って、iframe に表示するページの適当な DOM に click イベントのリスナーを仕掛けて、それで hide メソッドを起動すれば ModalPopup を非表示にできます。

ただし、iframe に表示するページは親ページと同じドメインのものでないと DOM が取得できないので注意してください(クロスサイトスクリプト対策だそうです)。

そのサンプルコードを以下に書いておきます。また、実際に動かして試すことができるよう 実験室 にアップしました。興味のある方は試してみてください。

親ページ

<%@ Page Language="C#" %>
<%@ Register Assembly="AjaxControlToolkit" 
    Namespace="AjaxControlToolkit" 
    TagPrefix="asp" %>

<!DOCTYPE html PUBLIC "-//W3C//DTD XHTML 1.0 Transitional//EN"
 "http://www.w3.org/TR/xhtml1/DTD/xhtml1-transitional.dtd">

<script runat="server">
 
</script>

<html xmlns="http://www.w3.org/1999/xhtml">
<head runat="server">
    <title></title>
    <script type="text/javascript">
    //<![CDATA[

        // iframe 内の document オブジェクトを取得。
        // contentWindow は IE 用。
        // contentDocument は Firefox 用。
        function iframeRef(frameRef) {
            return frameRef.contentWindow ?
                frameRef.contentWindow.document : 
                    frameRef.contentDocument;
        }

        function hideModalPopup() {
            var modalPopup = 
                $find('programmaticModalPopupBehavior');
            modalPopup.hide();
        }

        function showModalPopup() {
            var ifm = iframeRef($get('iframe1'));
            var btn = ifm.getElementById('hideButton');
            // hide するとリスナーも解除されてしまうので、
            // (btn.click が null になることで確認できる)
            // ModalPopup を表示するたびリスナーをアタッチ
            // する必要がある。
            if (btn.onclick == null) {
                if (window.addEventListener) {
                    btn.addEventListener('click',
                                         hideModalPopup, 
                                         false);
                } else if (window.attachEvent) {
                    btn.attachEvent('onclick', 
                                    hideModalPopup);
                }
            }

            var modalPopup = 
                $find('programmaticModalPopupBehavior');
            modalPopup.show();
        }
    //]]>
    </script>

    <style type="text/css">
        /*Modal Popup*/
        .modalBackground
        {
            background-color: Gray;
            filter: alpha(opacity=70);
            opacity: 0.7;
        }
        .popup
        {
            background-color: White;
        }
    </style>
</head>
<body>
    <form id="form1" runat="server">
    <asp:ToolkitScriptManager 
        ID="ToolkitScriptManager1" 
        runat="server">
    </asp:ToolkitScriptManager>  

    <h1>ModalPopup Test</h1>

    <asp:Button ID="DummyButton" 
        runat="server"
        style="display: none;" />

    <input type="button" 
        value="Show ModalPopup" 
        onclick="showModalPopup();" />

    <asp:Panel 
        ID="Panel1" 
        runat="server" 
        CssClass="popup">
        <iframe 
            id="iframe1" 
            src="190-PageIniframe.aspx">
        </iframe>
    </asp:Panel>

    <asp:ModalPopupExtender 
        ID="ModalPopupExtender1" 
        runat="server"
        TargetControlID="DummyButton" 
        BehaviorID="programmaticModalPopupBehavior" 
        BackgroundCssClass="modalBackground" 
        PopupControlID="Panel1">
    </asp:ModalPopupExtender>
    </form>
</body>
</html>

iframe に表示するページ

<%@ Page Language="C#" %>

<!DOCTYPE html PUBLIC "-//W3C//DTD XHTML 1.0 Transitional//EN"
 "http://www.w3.org/TR/xhtml1/DTD/xhtml1-transitional.dtd">

<script runat="server">

</script>

<html xmlns="http://www.w3.org/1999/xhtml">
<head runat="server">
    <title></title>
</head>
<body>
    <form id="form1" runat="server">
    <div>
        <h1>Page in iframe</h1>
        <input type="button" 
            id="hideButton" 
            value="Hide ModalPopup" />
    </div>
    </form>
</body>
</html>

Tags: ,

AJAX

WebResource.axd の HTTP 404 エラー

by WebSurfer 2013年1月26日 17:09

WebResource.axd の HTTP 404 エラーのトラブルシューティングにつきいろいろ調べたので、今後役に立つかもしれない情報を備忘録として書いておきます。

まず、トラブルシューティングの情報で、ググって探した中でよさそうだと思ったページを以下に書いておきます。

Troubleshooting WebResource.axd

Web Resources Troubleshooting

前者のページでは、以下の事項がエラーの原因として挙げられています。自分もそう思います。

  1. Missing compression exclusion
  2. Slight error with compression module
  3. Missing MachineKey / ValidationKey
  4. Bad IIS setup, specifically the Application extension mapping

ただし、MSDN フォーラムで、.Net Framework 4 関連のアップデートを、すべてアンインストールしてから 再インストールしたら問題が解決したという話がありましたので、Windows Update の失敗(結果として MachineKey の設定が壊れる?)も原因として考えた方がよさそうです。

上記の 4 に関連して、"Verify that file exists" のチェックを外すよう、上に紹介したページに書かれています。その理由は、チェックを入れると iis は事前にファイルシステムに当該ファイルが存在するか確認するが、WebResource.axd というファイルはファイルシステムに存在しないのでエラーになる(結果 HTTP 404 を返す)ということだそうです。そのことは以下のページに詳しく書いてあります。

The Verify That File Exists Setting

なお、上記は iis6 の場合で、iis7 には "Verify that file exists" というチェックボックスは無いです。それに代わるものは以下のページを見てください。

Tip / Trick: how to turn off "verify file exists" in IIS7

iis7 マネージャーのハンドラマッピングの設定で、[要求のマップ先が次の場合のみハンドラを呼び出す(I)]にチェックを入れて、[ファイル(F)]を選択することが、iis6 で "Verify that file exists" にチェックを入れるのと同じことになるそうです。なので、下の画像のようにチェックを外す(resourceType="Unspecified" に設定する)必要があります。

HTTP ハンドラの設定

ただ、デフォルトで間違いなく設定される(チェックは外れている)はずなので、自分でいじったりしなければ、これが 404 エラーの原因とは考えにくいですが。

404 エラーを返すのが特定の WebResource.axd のみの場合、その WebResource.axd に指定されているリソース(ファイル)を特定したい場合があると思います。

WebResource.axd のクエリ文字列のパラメータ d には、HTTP ハンドラが取得すべきファイルが指定されています。しかし、パラメータ d は暗号化されているため、そのまま見てもどのファイルを取得しようとしているかは分かりません。

パラメータ d の詳細については MSDN マガジンの ASP.NET AJAX アプリケーションの国際化 の「動作のしくみ」のセクションを見てください。

このページに "System.Web.UI.Page クラスの内部静的メソッド DecryptString および EncryptString を使用して、ページでこれらの文字列を暗号化および復号化できます" と書いてありますが、自分が調べた限りでは、Page クラスにはそのようなメソッドは公開されていません。

WebResource.axd のパラメータ d の値を復号する方法は、以下のページが参考になると思います。

Debugging ASP.NET 2.0 Web Resources:Decrypting the URL and Getting the Resource Name

そのページの下の方に "I am attaching a standalone page that you can drop in your application’s root and request it." とありますが、その a standalone page をクリックすると WebResources.aspx というソースファイルを入手できます。

入手できたら WebResources.aspx を問題の起こっている Web アプリケーションのルート直下に配置して使ってみてください。当方で検証した限りでは問題なく復号できました。

Tags: ,

ASP.NET

About this blog

2010年5月にこのブログを立ち上げました。主に ASP.NET Web アプリ関係の記事です。

Calendar

<<  2024年4月  >>
31123456
78910111213
14151617181920
21222324252627
2829301234
567891011

View posts in large calendar