by WebSurfer
2011年4月30日 12:52
2017/8/16 注記追加
Windows 10 IE11 では Quirks モード(IE5 相当)にしても expression 関数が働かないようで、テーブルのヘッダ・列は固定されませんのでご注意ください。この記事はもう意味がないかもしれませんが、せっかく書いたので残しておきます。
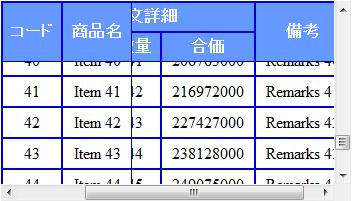
以前の記事 table のヘッダ、列を固定 では ListView を使ったときの例を書きましたが、ここでは GridView を使ったときの例を紹介します。 (2013/2/7 追記:このページに紹介したのは IE の互換モード(Quirks モード)専用ですが、GridView のヘッダ、列を固定(その 2)のページに IE7+ (標準モードの), Firefox, Chrome, Safari, Opera コンパチのものを書きましたので、そちらも見てください)
GridView も html にレンダリングされると table, tr, th, td などの要素になりますが、それらは自動的に(勝手に)生成され、かつ、直接スタイルを適用できないので結構面倒です。
今回は先の ListView を使った場合の例よりヘッダーを少し複雑にしました(一部のセルの rowspan を 2 にしてみました)ので、ますます面倒になっています。(笑)
という訳で、実際にはあまり役に立たないと思いますが、せっかく苦労して作ったので書いておくことにしました。
上の画像を出力したコードは下記の通りです。実際に動かして試せるよう 実験室 にアップしましたので、興味のある方は試してみてください。
<%@ Page Language="C#" %>
<%@ Import Namespace="System.Data" %>

<!DOCTYPE html PUBLIC "-//W3C//DTD XHTML 1.0 Transitional//EN"
"http://www.w3.org/TR/xhtml1/DTD/xhtml1-transitional.dtd">

<script runat="server">
  DataTable CreateDataTable()
  {
    DataTable dt = new DataTable();
    DataRow dr;

    dt.Columns.Add(new DataColumn("Code", typeof(Int32)));
    dt.Columns.Add(new DataColumn("Name", typeof(string)));
    dt.Columns.Add(new DataColumn("Price", typeof(Int32)));
    dt.Columns.Add(new DataColumn("Qty", typeof(Int32)));
    dt.Columns.Add(new DataColumn("Amount", typeof(Int32)));
    dt.Columns.Add(new DataColumn("Remarks", typeof(string)));

    for (int i = 0; i < 50; i++)
    {
      dr = dt.NewRow();
      dr["Code"] = i;
      dr["Name"] = "Item " + i.ToString();
      dr["Price"] = 123000 * (i + 1);
      dr["Qty"] = i + 1;
      dr["Amount"] = 123000 * (i + 1) * (i + 1);
      dr["Remarks"] = "Remarks " + i.ToString();
      dt.Rows.Add(dr);
    }
    return dt;
  }

  void Page_Load(Object sender, EventArgs e)
  {
    if (!IsPostBack)
    {
      GridView1.DataSource = CreateDataTable();
      GridView1.DataBind();
    }
  }

  // RowDataBound で細工すると PostBack で表示が崩れるので
  // 注意(ViewState との関係が崩れるらしい)
  protected void GridView1_RowCreated(object sender,
    GridViewRowEventArgs e)
  {
    if (e.Row.RowType == DataControlRowType.Header)
    {
      System.Collections.Generic.List<TableCell> cells =
        new System.Collections.Generic.List<TableCell>();
      foreach (TableCell cell in e.Row.Cells)
      {
        cells.Add(cell);
      }

      GridViewRow row1 =
        new GridViewRow(
          -1,
          -1,
          DataControlRowType.Header,
          DataControlRowState.Normal);
      cells[0].RowSpan = 2;
      cells[1].RowSpan = 2;
      cells[5].RowSpan = 2;

      TableHeaderCell headerCell = new TableHeaderCell();
      headerCell.ColumnSpan = 3;
      headerCell.Controls.Add(new LiteralControl("注文詳細"));
      row1.Cells.Add(cells[0]);
      row1.Cells.Add(cells[1]);
      row1.Cells.Add(headerCell);
      row1.Cells.Add(cells[5]);

      GridViewRow row2 =
        new GridViewRow(
          -1,
          -1,
          DataControlRowType.Header,
          DataControlRowState.Normal);
      for (int i = 2; i < 5; i++)
      {
        row2.Cells.Add(cells[i]);
      }
      row1.CssClass = "FreezingHeader1";
      row2.CssClass = "FreezingHeader2";
      GridView1.Controls[0].Controls.Clear();
      GridView1.Controls[0].Controls.Add(row1);
      GridView1.Controls[0].Controls.Add(row2);
    }
  }

  // position:relative を適用することにより border の
  // 幅が変わってしまう。以下はその調整。
  protected void GridView1_PreRender(object sender, EventArgs e)
  {
    // ヘッダは 3 行できるのでそれの識別用
    int count = 0;

    // GridView.Rows はデータ行の GridViewRow のみ
    // GridView1.Controls[0].Controls はヘッダ、
    // フッターも含む
    foreach (GridViewRow row in GridView1.Controls[0].Controls)
    {
      if (row.RowType == DataControlRowType.Header)
      {
        if (count == 0)
        {
          row.Cells[0].Style["border-width"] = "2 1 1 2";
          row.Cells[1].Style["border-width"] = "2 1 1 1";

          // これがないとヘッダの "備考" のセルの下半分
          // が切れてしまう。
          // "コード" と "商品名" セルには FreezingCol
          // に position:relative が含まれるので不用
          row.Cells[3].Style["position"] = "relative";
          row.Cells[3].Style["border-width"] = "2 2 1 1";
        }
        // 何故か自動でできてしまうヘッダの 3 行目を消去
        if (count == 2)
        {
          row.Style["display"] = "none";
        }
      }
      else if (row.RowType == DataControlRowType.DataRow)
      {
        if (row.RowIndex == GridView1.Rows.Count - 1)
        {
          row.Cells[0].Style["border-width"] = "1 1 2 2";
          row.Cells[1].Style["border-width"] = "1 1 2 1";
        }
        else
        {
          row.Cells[0].Style["border-width"] = "1 1 1 2";
          row.Cells[1].Style["border-width"] = "1 1 1 1";
        }
      }
      else if (row.RowType == DataControlRowType.Footer)
      {
        // 今回、フッターはないので何もしない。
      }
      count++;
    }
  }
</script>

<html xmlns="http://www.w3.org/1999/xhtml">
<head runat="server">
  <title></title>
  <%--Quirks モードに設定--%>
  <meta http-equiv="X-UA-Compatible" content="IE=5" />
  <style type="text/css">
    .FreezingHeader1
    {
      z-index: 10;
      position: relative;
      top: expression(this.offsetParent.scrollTop);
      background-color: #0000cc;
    }

    .FreezingHeader2
    {
      z-index: 5;
      position: relative;
      top: expression(this.offsetParent.scrollTop);
      background-color: #0000cc;
    }

    .FreezingCol
    {
      z-index: 1;
      left: expression(
        document.getElementById("freezingDiv").scrollLeft);
      position: relative;
      background-color: white;
    }

    #freezingDiv
    {
      overflow: auto;
      width: 350px;
      height: 200px;
    }

    table.style1
    {
      border-style: none; /* 指定するとスクロールでずれる */
      text-align: center;
      border-collapse: collapse;
    }

    table.style1 th
    {
      border-style: solid;
      border-width: 2px;
      border-color: #0000cc;
      background-color: #6699FF;
      color: #FFFFFF;
      padding: 5px;
    }

    table.style1 td
    {
      border-style: solid;
      border-width: 2px;
      border-color: #0000cc;
      padding: 5px;
    }
  </style>
</head>
<body>
  <form id="form1" runat="server">
  <div id="freezingDiv">
    <asp:GridView ID="GridView1"
      runat="server"
      CssClass="style1"
      Width="450px"
      AutoGenerateColumns="False"
      OnRowCreated="GridView1_RowCreated"
      OnPreRender="GridView1_PreRender">
      <Columns>
        <asp:BoundField DataField="Code"
          HeaderText="コード" >
          <HeaderStyle CssClass="FreezingCol" />
          <ItemStyle CssClass="FreezingCol" />
        </asp:BoundField>
        <asp:BoundField DataField="Name"
          HeaderText="商品名" >
          <HeaderStyle CssClass="FreezingCol" />
          <ItemStyle CssClass="FreezingCol" />
        </asp:BoundField>
        <asp:BoundField DataField="Price"
          HeaderText="単価" >
        </asp:BoundField>
        <asp:BoundField DataField="Qty"
          HeaderText="数量" >
        </asp:BoundField>
        <asp:BoundField DataField="Amount"
          HeaderText="合価" >
        </asp:BoundField>
        <asp:BoundField DataField="Remarks"
          HeaderText="備考" >
        </asp:BoundField>
      </Columns>
    </asp:GridView>
  </div>
  <asp:Button ID="Button1"
    runat="server"
    Text="PostBack" />
  </form>
</body>
</html>
by WebSurfer
2010年11月7日 19:04
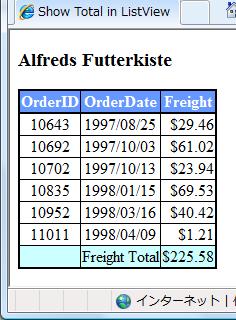
GirdView や ListView で、ある列の合計金額を計算して、フッターなどに表示したいというケースが時々あります。備忘録として、その例を書いておきます。
GridView は「行」(GridViewRow クラス)で構成されているのに対して、ListView は「項目」(ListViewItem クラス)で構成されているという違いがありますが、基本的な方法は行/項目にデータがバインドされるときのイベントを利用して、値を取得して合計していくという操作は同じだと思います。
GridView, ListView どちらの場合も、データソースコントロールが取得してバインドするデータが DataTable の場合(デフォルト)は、DataItem プロパティを使って DataRowView を取得できますので、それから各行/項目の値を取得するのがよさそうです。
合計した結果を書き込むところが、ちょっと違います。
GridView では、フッターでも RowDataBound イベントが発生します。そのイベントハンドラでデータ行かフッター行かが判定でき、フッター行の場合に合計をフッターに書き込むことができます。
ShowFooter="True" として、その中の TableCell の Text プロパティに書き込む例は以下の通りです。
decimal total = 0m;

protected void GridView1_RowDataBound(object sender,
  GridViewRowEventArgs e)
{
  if (e.Row.RowType == DataControlRowType.DataRow)
  {
    DataRowView drv = (DataRowView)e.Row.DataItem;
    total = total + (decimal)drv["Freight"];
  }
  else if (e.Row.RowType == DataControlRowType.Footer)
  {
    e.Row.Cells[1].Text = "Freight Total";
    e.Row.Cells[2].Text = String.Format("${0:N2}", total);
  }
}
ListView では、合計の取得は ItemDataBound イベントハンドラで可能ですが、GridView の時のようにフッター行に合計結果を書き込むことはできません。
LayoutTemplate にフッターの行を追加して Label を配置し、その Text プロパティに書き込むことになります。そのタイミングは、ListView.DataBound イベントがよさそうです。
上の画像を出力した ListView のコードを以下にアップしておきます。
<%@ Page Language="C#" %>
<%@ Import Namespace="System.Data" %>

<!DOCTYPE html PUBLIC "-//W3C//DTD XHTML 1.0 Transitional//EN"
"http://www.w3.org/TR/xhtml1/DTD/xhtml1-transitional.dtd">

<script runat="server">
  decimal total = 0m;

  protected void ListView1_ItemDataBound(object sender,
      ListViewItemEventArgs e)
  {
    if (e.Item.ItemType == ListViewItemType.DataItem)
    {
      ListViewDataItem lvdi = (ListViewDataItem)e.Item;
      DataRowView drv = (DataRowView)lvdi.DataItem;
      total = total + (decimal)drv["Freight"];
    }
  }

  protected void ListView1_DataBound(object sender, EventArgs e)
  {
    Label label = (Label)ListView1.FindControl("totalLabel");
    label.Text = String.Format("${0:N2}", total);
  }
</script>

<html xmlns="http://www.w3.org/1999/xhtml">
<head runat="server">
  <title>Show Total in ListView</title>
  <style type="text/css">
    table.style1
    {
      border-style: solid;
      border-width: 2px;
      border-color: Black;
      text-align: center;
      border-collapse: collapse;
    }

    table.style1 th
    {
      border-style: solid;
      border-width: 2px 1px 2px 1px;
      border-color: Black;
      background-color: #6699FF;
      color: #FFFFFF;
    }

    table.style1 td
    {
      border-style: solid;
      border-width: 1px;
      border-color: Black;
    }

    .footer
    {
      background-color: #CCFFFF;
    }
  </style>

</head>
<body>
  <form id="form1" runat="server">
  <div>
    <h3>Alfreds Futterkiste</h3>
    <asp:SqlDataSource ID="SqlDataSource1" runat="server"
      ConnectionString="<%$ ConnectionStrings:Northwind %>"
      SelectCommand="SELECT [OrderID], [OrderDate], [Freight]
        FROM [Orders]
        WHERE [CustomerID]='ALFKI'">
    </asp:SqlDataSource>
    <asp:ListView ID="ListView1"
      runat="server"
      DataKeyNames="OrderID"
      DataSourceID="SqlDataSource1"
      EnableModelValidation="True"
      OnItemDataBound="ListView1_ItemDataBound"
      OnDataBound="ListView1_DataBound">
      <ItemTemplate>
        <tr>
          <td>
            <asp:Label ID="OrderIDLabel"
              runat="server"
              Text='<%# Eval("OrderID") %>' />
          </td>
          <td>
            <asp:Label ID="OrderDateLabel"
              runat="server"
              Text='<%# Eval("OrderDate", "{0:yyyy/MM/dd}") %>' />
          </td>
          <td style="text-align: right;">
            <asp:Label ID="FreightLabel"
              runat="server"
              Text='<%# Eval("Freight", "${0:N2}") %>' />
          </td>
        </tr>
      </ItemTemplate>
      <LayoutTemplate>
        <table ID="itemPlaceholderContainer"
          runat="server"
          class="style1">
          <tr runat="server">
            <th runat="server">
              OrderID</th>
            <th runat="server">
              OrderDate</th>
            <th runat="server">
              Freight</th>
          </tr>
          <tr ID="itemPlaceholder" runat="server">
          </tr>
          <tr class="footer">
            <td></td>
            <td>Freight Total</td>
            <td style="text-align: right;">
              <asp:Label ID="totalLabel" runat="server" /></td>
          </tr>
        </table>
      </LayoutTemplate>
    </asp:ListView>
  </div>
  </form>
</body>
</html>
by WebSurfer
2010年10月8日 22:11
GirdView の各行に配置した複数の CheckBox に、一度に全部チェックを入れたり外したりする操作を、クライアントサイドのスクリプトで実行する方法の jQuery バージョンです。
普通の JavaScript を使ったバージョンは、先の記事 GridView 内の全 CheckBox をオン にありますので、見比べてみてください。
ネタは先の記事 jQuery の本を買いました で紹介した本の中のサンプルです。
コードは以下の通りです。説明はコードの中にコメントとして入れましたので、そちらを参照してください。
jQuery を使うと、普通の JavaScript を使った場合と比べて、かなりコード量を減らすことができるのは確かのようです。でも、考え方がかなり違うようで、コードの書き方も自分の常識を超えてました。jQuery のセレクタのパワーを垣間見ることができたような気もしますが、正直言って、まだよく分かってないです。(笑)
<%@ Page Language="C#" %>
<%@ Import Namespace="System.Data" %>
<!DOCTYPE html PUBLIC "-//W3C//DTD XHTML 1.0 Transitional//EN"
"http://www.w3.org/TR/xhtml1/DTD/xhtml1-transitional.dtd">

<script runat="server">
  DataTable CreateDataTable()
  {
    DataTable dt = new DataTable();
    DataRow dr;

    dt.Columns.Add(new DataColumn("Item", typeof(Int32)));
    dt.Columns.Add(new DataColumn("Name", typeof(string)));
    dt.Columns.Add(new DataColumn("Price", typeof(Int32)));

    for (int i = 0; i < 10; i++)
    {
      dr = dt.NewRow();
      dr["Item"] = i;
      dr["Name"] = "Item " + i.ToString();
      dr["Price"] = 123000 * (i + 1);
      dt.Rows.Add(dr);
    }
    return dt;
  }

  void Page_Load(Object sender, EventArgs e)
  {
    if (!IsPostBack)
    {
      GridView1.DataSource = CreateDataTable();
      GridView1.DataBind();
    }
  }
</script>

<html xmlns="http://www.w3.org/1999/xhtml">
<head id="Head1" runat="server">
  <title>Check/Uncheck All CheckBoxes in a GridView</title>
  <script src="Scripts/jquery-1.4.1.js" type="text/javascript"></script>
  <script type="text/javascript">
    <!--
    $(function () {
      // ヘッダーの CheckBox にチェックを入れる/外すのと連
      // 動して、各行に配置した CheckBox すべてにチェックを
      // 入れる/外す。
      $('table tr th input:checkbox').click(function () {
        $('table tr td input:checkbox')
          .attr('checked', $(this).is(':checked'));
      });

      // 各行に配置した CheckBox のすべてにチェックが入った
      // 時、ヘッダーの CheckBox にもチェックを入れる。
      // 各行に配置した CheckBox の一つでもチェックを外すと、
      // ヘッダーの CheckBox のチェックが外れる。
      $('table tr td input:checkbox').click(function () {
        var chkAll =
          $('table tr td input:checkbox:not(:checked)')
            .length == 0 ? true : false;
        $('table tr th input:checkbox')
          .attr('checked', chkAll);
      });

      // [Check All]ボタンクリックで、すべての CheckBox
      // にチェックを入れる。
      $('#checkAll').click(function () {
        $('table input:checkbox').attr('checked', true);
      });

      // [Uncheck All]ボタンクリックで、すべての CheckBox
      // のチェックを外す。
      $('#uncheckAll').click(function () {
        $('table input:checkbox').attr('checked', false);
      });
    });
  //-->
  </script>
</head>
<body>
  <form id="form1" runat="server">
  <div>
    <h2>Check/Uncheck All CheckBoxes</h2>
    <input type="button"
      id="checkAll"
      value="Check All" />
    <input type="button"
      id="uncheckAll"
      value="Uncheck All" />
    <asp:GridView ID="GridView1"
      runat="server"
      AutoGenerateColumns="False">
      <Columns>
        <asp:TemplateField>
          <HeaderTemplate>
            <input id="Checkbox1" type="checkbox" />
          </HeaderTemplate>
          <ItemTemplate>
            <input id="Checkbox2" type="checkbox" />
          </ItemTemplate>
        </asp:TemplateField>
        <asp:BoundField HeaderText="Item" DataField="Item" />
        <asp:BoundField HeaderText="Name" DataField="Name" />
        <asp:BoundField HeaderText="Price" DataField="Price" />
      </Columns>
    </asp:GridView>
  </div>
  </form>
</body>
</html>
------------ 2010/4/24 追記 ------------
この記事で紹介したコードを実際に動かして試せるよう 実験室 にアップしました。興味のある方は試してみてください。